Difference between revisions of "Backup/AutoBackup"
(→AutoBackup between different receivers) |
|||
| (105 intermediate revisions by the same user not shown) | |||
| Line 1: | Line 1: | ||
| − | When you want to | + | =='''Intro'''== |
| − | + | When you quickly want to flash your receiver and keep all your settings, the AutoBackup (as of OpenPLi version 7 it is moved from Applications to Settings -> Auto backup) | |
| − | All your satellite and bouquet settings | + | is a very handy tool that will help you restore almost everything after a flash procedure. Being saved/restored are: |
| + | *All your cable/satellite/terrestrial and bouquet settings | ||
| + | *CCcam/OSCam settings | ||
| + | *Network settings | ||
| + | *Timer settings | ||
| + | *Picons | ||
| + | *Some plugins, well the ones that are present in the OpenPLi feeds. | ||
| + | *Etc. | ||
| − | |||
| − | |||
| + | [[File:Backup-Autobackup-001.jpg|frameles|centre|800px]] | ||
| − | + | =='''How to create an AutoBackup'''== | |
| − | ''' | + | As of OpenPLi 7 AutoBackup has moved from the plugin browser to '''Main menu > Setup > AutoBackup''', until OpenPLi 6.2 it was present in the plugin browser '''Menu''' > '''Plugins'''<br /> |
| − | + | *Select a Backup location, preferable a '''USB''' device<br /> | |
| − | + | *Daily automate backup: '''Enable'''<br /> | |
| + | *Select a time: e.g. '''04:00'''<br /> | ||
| + | *Create Autoinstall: '''on'''<br /> | ||
| + | *EPG cache backup: '''off'''<br /> | ||
| − | |||
| − | |||
| − | |||
| − | |||
| − | |||
| − | To test, select the '''yellow''' button. | + | |
| + | To test, select the <span style="color:gold;font-size: 100%"> '''yellow Manual'''<span style="color:black;font-size: 100%"> button. | ||
If everything is ok, you see the Last Backup date with a recent timestamp. | If everything is ok, you see the Last Backup date with a recent timestamp. | ||
| + | |||
| + | =='''How to use AutoBackup'''== | ||
| + | When you want to flash your receiver with OpenPLi, take the following steps: | ||
| + | *Manualy make an Autobackup with the option Autoinstall enabled. | ||
| + | **Create in on a USB stick | ||
| + | **Or create it on an internal Hard Disk Drive (HDD), when it is present. | ||
| + | *Remove all the USB devices from you receiver | ||
| + | *Follow this link [[Supported Receivers | <span style="color:SteelBlue">instruction</span>]] and click on your receiver brand on how to flash. | ||
| + | *Flash your receiver with the image | ||
| + | *After flashing remove the USB stick with the image you flashed it. | ||
| + | **Insert the USB stick that holds the AutoBackup files, | ||
| + | **When you have created the AutoBackup on a internal HDD OpenPLi you have to do nothing, OpenPLi will find the AutoBack and restore it. | ||
| + | *Reboot | ||
| + | *You will be asked if you want to restore the AutoBackup | ||
| + | |||
| + | |||
| + | <u>'''Note:'''</u> When for some reason you want to manually restore everything don't use the restore (blue button), but go in to the menu of Auto backup and choose autoinstall, as this will restore not only the config, but also picons and plugins. If you choose the blue button, so restore, it will only restore the config. | ||
| + | |||
| + | |||
| + | =='''AutoBackup between different receivers'''== | ||
| + | You can use a Backup made by AutoBackup between different receivers. But there are 3 pitfalls. | ||
| + | #You must be sure that the Video mode, 720, 1080i, 1080p, 2160p or what ever, can be set on the receiver that you are restoring/autoinstalling the AutoBackup you made from the other receiver. If it cannot cope with the video mode the screen stays black and you cannot see what you do after it boots. | ||
| + | #The same as pitfall number 1, but now for the TV, you must also be sure, the TV that connects to the receiver you do a restore/autoinstall can handle the video mode! | ||
| + | #When the receiver has WiFi (WLAN) also activate LAN, as sometimes the receiver you restore WLAN won't function and than you can use LAN also. | ||
| + | |||
| + | |||
| + | [[File:Autobackup-002.jpg|frameles|centre|800px]] | ||
| + | |||
| + | =='''Adding plugins that are not in the Feed eg. installing a IPK during restore'''== | ||
| + | When there is a plugin you want to be installed during a restore, simply add the desired IPK file in the backup folder. This is of course not needed when the plugin is in the OpenPLi feed. | ||
| − | |||
| − | |||
| − | |||
| − | |||
| − | |||
| − | |||
| − | |||
| − | '''(*1)''' <u>Remark..</u> ''You can also put the image on the existing USB disk | + | '''(*1)''' <u>Remark..</u> ''You can also put the image on the existing USB disk, but you will need to remove the image file after your flash procedure. If you don't do this, your receiver will be re-flashed if you update your receiver through the software-update option.'' |
Latest revision as of 11:44, 9 July 2022
Contents
Intro
When you quickly want to flash your receiver and keep all your settings, the AutoBackup (as of OpenPLi version 7 it is moved from Applications to Settings -> Auto backup) is a very handy tool that will help you restore almost everything after a flash procedure. Being saved/restored are:
- All your cable/satellite/terrestrial and bouquet settings
- CCcam/OSCam settings
- Network settings
- Timer settings
- Picons
- Some plugins, well the ones that are present in the OpenPLi feeds.
- Etc.
How to create an AutoBackup
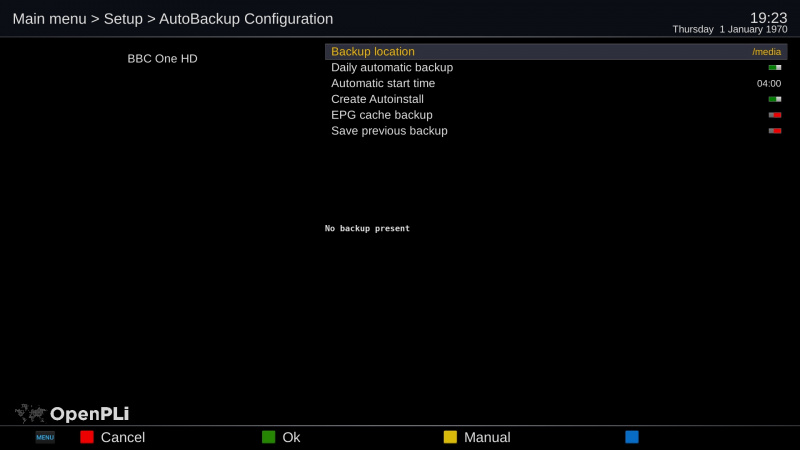
As of OpenPLi 7 AutoBackup has moved from the plugin browser to Main menu > Setup > AutoBackup, until OpenPLi 6.2 it was present in the plugin browser Menu > Plugins
- Select a Backup location, preferable a USB device
- Daily automate backup: Enable
- Select a time: e.g. 04:00
- Create Autoinstall: on
- EPG cache backup: off
To test, select the yellow Manual button. If everything is ok, you see the Last Backup date with a recent timestamp.
How to use AutoBackup
When you want to flash your receiver with OpenPLi, take the following steps:
- Manualy make an Autobackup with the option Autoinstall enabled.
- Create in on a USB stick
- Or create it on an internal Hard Disk Drive (HDD), when it is present.
- Remove all the USB devices from you receiver
- Follow this link instruction and click on your receiver brand on how to flash.
- Flash your receiver with the image
- After flashing remove the USB stick with the image you flashed it.
- Insert the USB stick that holds the AutoBackup files,
- When you have created the AutoBackup on a internal HDD OpenPLi you have to do nothing, OpenPLi will find the AutoBack and restore it.
- Reboot
- You will be asked if you want to restore the AutoBackup
Note: When for some reason you want to manually restore everything don't use the restore (blue button), but go in to the menu of Auto backup and choose autoinstall, as this will restore not only the config, but also picons and plugins. If you choose the blue button, so restore, it will only restore the config.
AutoBackup between different receivers
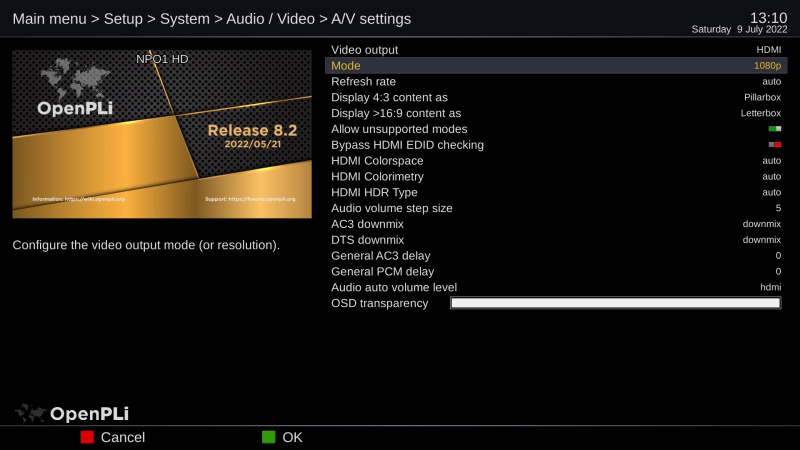
You can use a Backup made by AutoBackup between different receivers. But there are 3 pitfalls.
- You must be sure that the Video mode, 720, 1080i, 1080p, 2160p or what ever, can be set on the receiver that you are restoring/autoinstalling the AutoBackup you made from the other receiver. If it cannot cope with the video mode the screen stays black and you cannot see what you do after it boots.
- The same as pitfall number 1, but now for the TV, you must also be sure, the TV that connects to the receiver you do a restore/autoinstall can handle the video mode!
- When the receiver has WiFi (WLAN) also activate LAN, as sometimes the receiver you restore WLAN won't function and than you can use LAN also.
Adding plugins that are not in the Feed eg. installing a IPK during restore
When there is a plugin you want to be installed during a restore, simply add the desired IPK file in the backup folder. This is of course not needed when the plugin is in the OpenPLi feed.
(*1) Remark.. You can also put the image on the existing USB disk, but you will need to remove the image file after your flash procedure. If you don't do this, your receiver will be re-flashed if you update your receiver through the software-update option.

