Difference between revisions of "Webif"
(→Access OScam webinterface) |
(→Signal checking (SNR), the satfinder function in the Web Interface) |
||
| (31 intermediate revisions by 2 users not shown) | |||
| Line 25: | Line 25: | ||
| − | ==''' | + | =='''Signal checking (SNR), the satfinder function in the Web Interface'''== |
| − | For unknown reason the Web Interface builders didn't add the | + | If you want to check your signal quality use this kinda hidden function in Open Webif. For unknown reason the Web Interface builders didn't add the sat finder (signal measuring) function,to be easy accessible, but it is there and you can check it out. |
| − | Go to: '''http:// | + | Go to: '''<nowiki>http://ipaddressofyourreceiver/mobile/satfinder</nowiki>''' to see the signal levels of the channel your receiver is tuned in. |
| + | [[File:Webif-008.jpg|frameless|centre|1000px]] | ||
| + | As of '''OpenPLi 10''' you will have to use the "Modern" webinterface, goto OpenWebif and OpenWebif Settings then select Modern | ||
| + | |||
| + | [[File:Webif-009.png|frameless|centre|1000px]] | ||
=='''Make a screenshot'''== | =='''Make a screenshot'''== | ||
| − | If you want to take a screenshot, let's say to show a certain result to someone, you can | + | If you want to take a screenshot, let's say to show a certain result to someone, you can take a screenshot of the current state of the screen on your TV using Webif. When in Webif on the left of the screen you open remote control and click on "Capture screenshot". |
| − | |||
[[File:Tips and Tricks-003.png|frameles|centre|800px]] | [[File:Tips and Tricks-003.png|frameles|centre|800px]] | ||
| + | This is the result and it is best to enable the high resolution (see red arrow): | ||
| + | [[File:Tips and Tricks-004.png|frameles|centre|800px]] | ||
| + | |||
| + | There are three modes: Screenshot (all), Screenshot (video), screenshot (OSD). Select the one that is best suited for your needs. The OSD one just shows menu/screen text and avoids copyright issues. | ||
| + | Right click anywhere on the screen and click on "Save image as". You can then select where to save the screenshot. You can select a different name too. | ||
| − | + | [[File:owif save as.png|frameles|centre|800px]] | |
| − | + | As an alternative, you can just paste this in your web browser's address bar. Adjust to match your IP address | |
| + | '''<nowiki>http://192.168.1.5/grab?format=jpg&mode=osd</nowiki>''' | ||
=='''Create timers'''== | =='''Create timers'''== | ||
| Line 67: | Line 76: | ||
=='''Access OScam webinterface'''== | =='''Access OScam webinterface'''== | ||
| − | Of course OScam has to | + | Of course OScam has to be [[Softcam/OSCam#OScam_install | <span style="color:SteelBlue">installed</span>]], if so, the easiest way to access the OScam webinterface is using OpenWebif |
[[File:Webif-006.jpg|frameless|centre|800px]] | [[File:Webif-006.jpg|frameless|centre|800px]] | ||
[[File:Webif-007.jpg|frameless|centre|800px]] | [[File:Webif-007.jpg|frameless|centre|800px]] | ||
Latest revision as of 14:14, 9 June 2025
Contents
OpenWebif information
With the Webif (short for Web interface) you can control your Box using a browser. The Web interface is included in OpenPLi. You can reach the WebIf by pointing your favorite web browser to the IP of your Box (e.g. http://192.168.0.21). The Web interface is fully embedded into Enigma2. It is able to use ANY functionality and obtain ANY Information Enigma2 can deliver. Webif has it's own developing site. Webif has many features and there all self explanatory, have fun.
Never connect your receiver direct to the internet
OpenWebif has the option to access it (GUI) using a login and password, this is meant for logging in from within a secure environment, like your personal network, eg. your LAN (RFC 1918), so not from the internet! This login is a “simple” script and not a hardened web server and therefor not secure to be used from the internet! If you want to access your receiver from the internet, you should use a secure solution, like using a VPN.
Access OpenWebif from another subnet
There are currently three levels possible:
1. Local access (= same subnet) is always allowed even if no login/pass is set (But if you enable auth, it will require auth).
2. VPN access (= any subnet from private address space) can be allowed to access w/o password (But if you enable auth, it will require auth).
3. External access non-optionally requires a login/pass to be set.
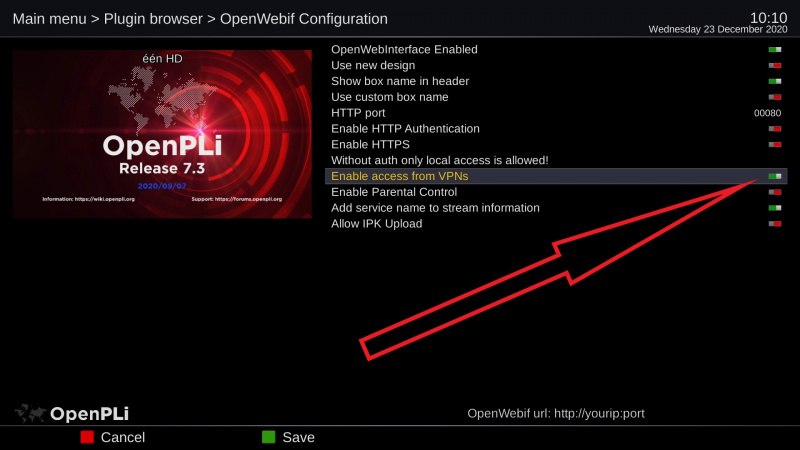
VPN access is disabled by default, just go to Menu -> Plugins -> OpenWebif and toggle the setting "Enable access from VPNs" (or whatever it gets translated to) to "yes".
If set to "yes" VPNs count as local network, if set to "no" VPNs are treated the same way as external networks.
Signal checking (SNR), the satfinder function in the Web Interface
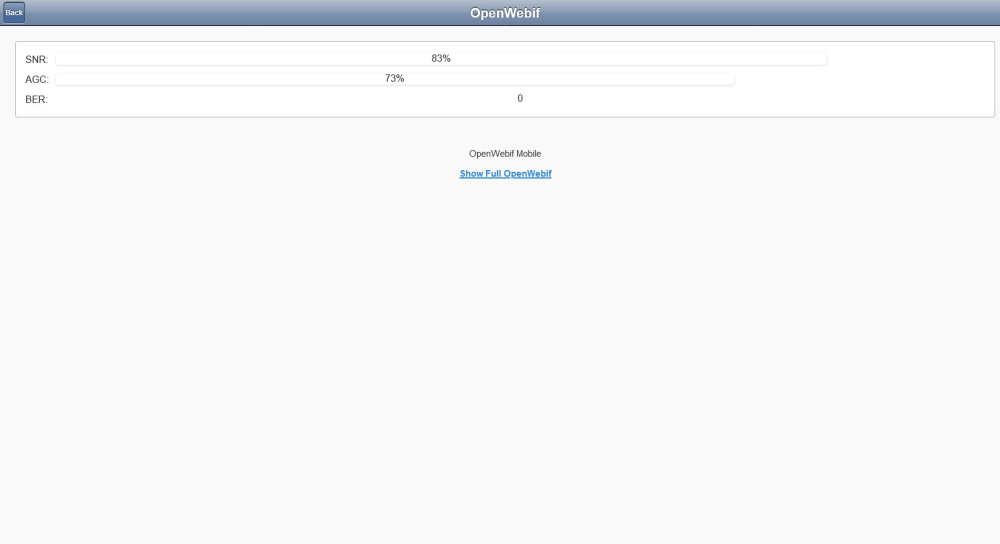
If you want to check your signal quality use this kinda hidden function in Open Webif. For unknown reason the Web Interface builders didn't add the sat finder (signal measuring) function,to be easy accessible, but it is there and you can check it out.
Go to: http://ipaddressofyourreceiver/mobile/satfinder to see the signal levels of the channel your receiver is tuned in.
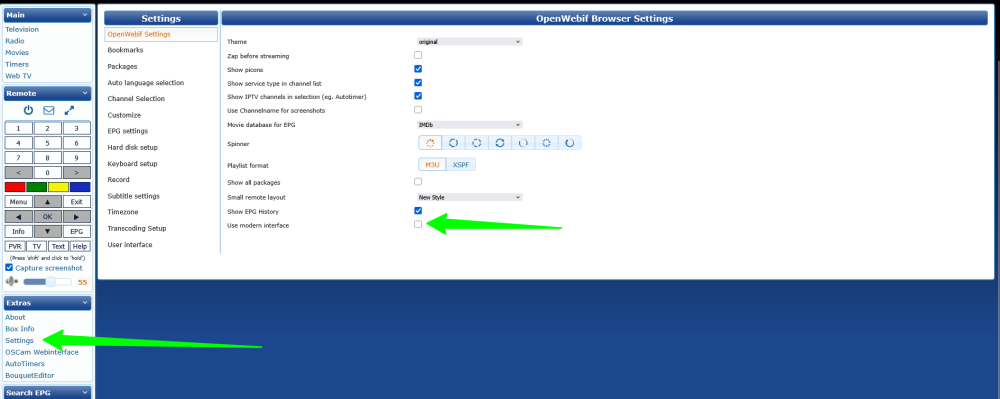
As of OpenPLi 10 you will have to use the "Modern" webinterface, goto OpenWebif and OpenWebif Settings then select Modern
Make a screenshot
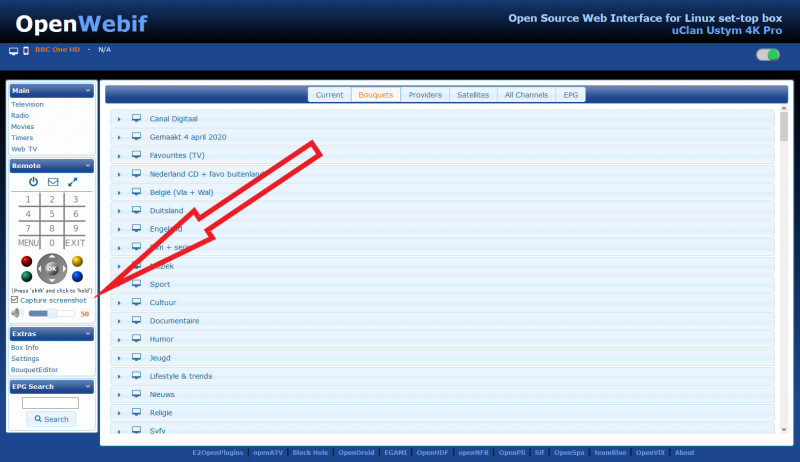
If you want to take a screenshot, let's say to show a certain result to someone, you can take a screenshot of the current state of the screen on your TV using Webif. When in Webif on the left of the screen you open remote control and click on "Capture screenshot".
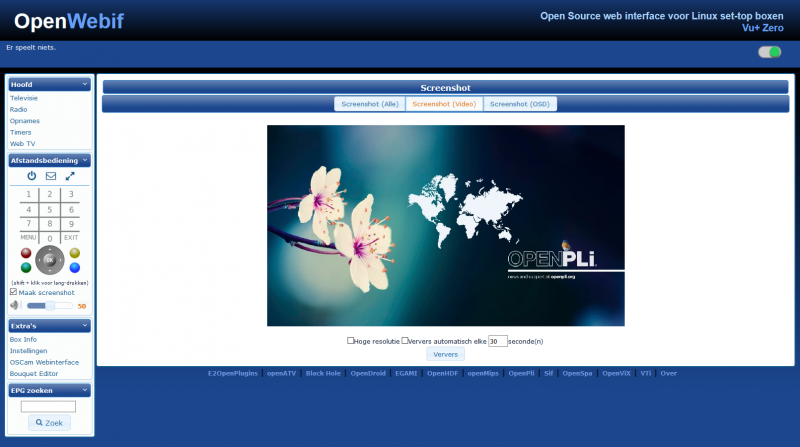
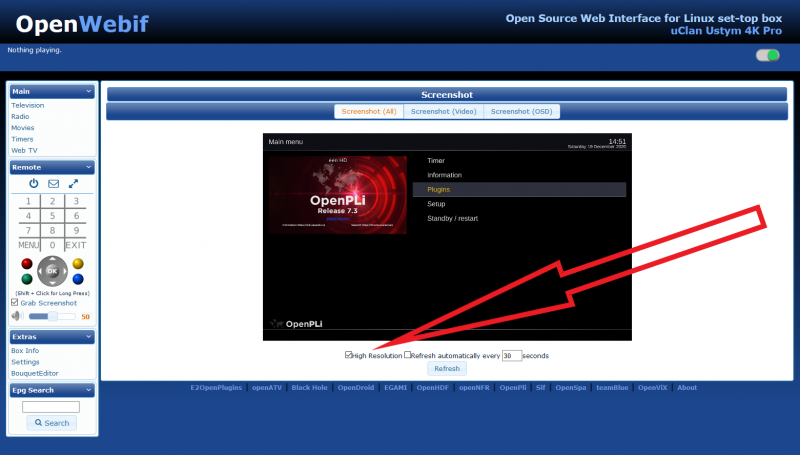
This is the result and it is best to enable the high resolution (see red arrow):
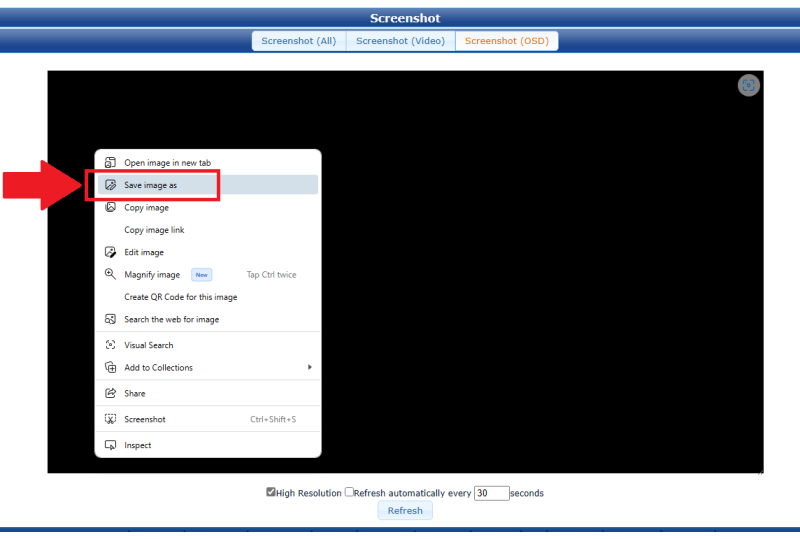
There are three modes: Screenshot (all), Screenshot (video), screenshot (OSD). Select the one that is best suited for your needs. The OSD one just shows menu/screen text and avoids copyright issues. Right click anywhere on the screen and click on "Save image as". You can then select where to save the screenshot. You can select a different name too.
As an alternative, you can just paste this in your web browser's address bar. Adjust to match your IP address
http://192.168.1.5/grab?format=jpg&mode=osd
Create timers
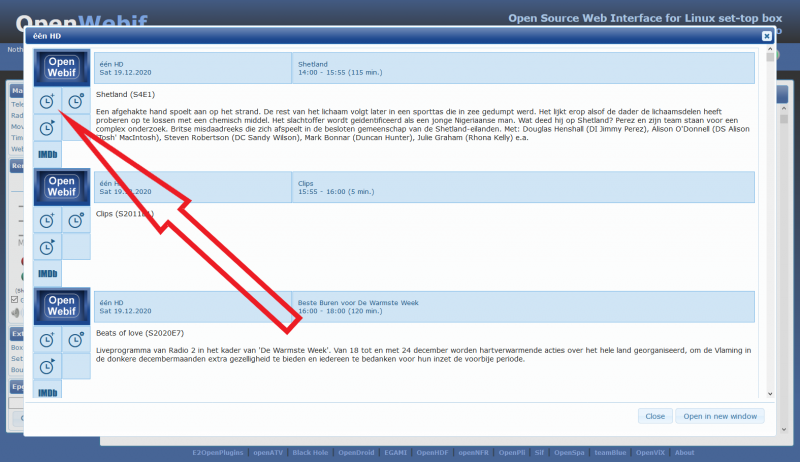
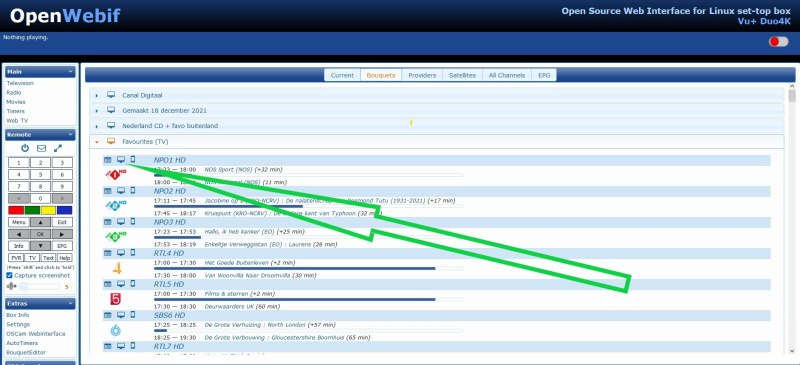
Open the EPG by pressing the icon below in any bouquet (channel list)
and then press the timer plus icon
Start a stream, watch TV from you PC or Tablet
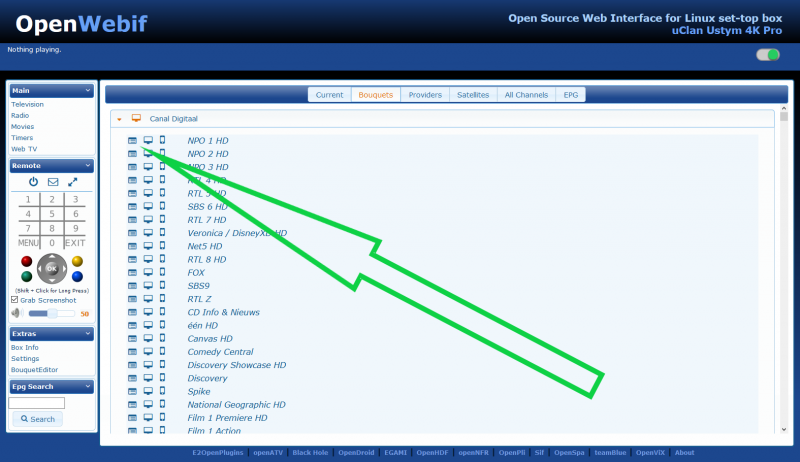
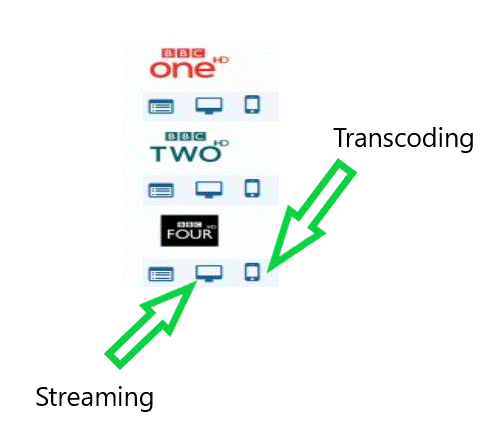
If you want to watch TV on a PC or Tablet, you can startup a stream. When you click on the icon the green arrow below is pointing your browser will start a media player on your PC or tablet and it will play the TV channel. If you don't have a media player installed you can try VLC || PC || Mac || Linux
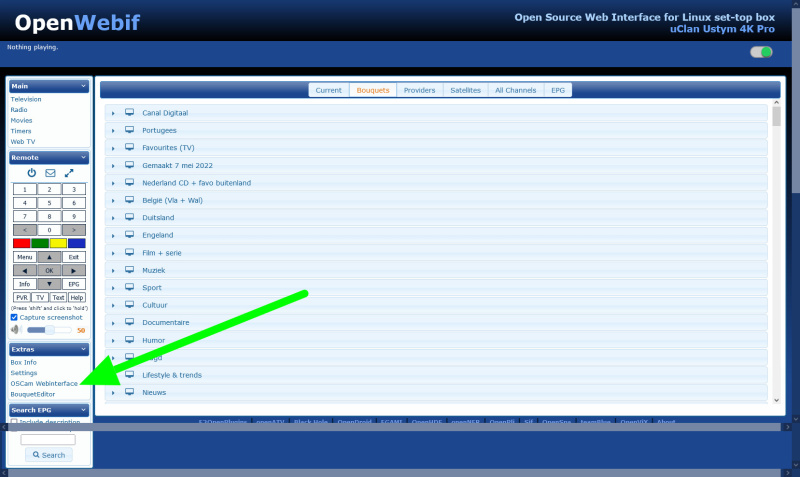
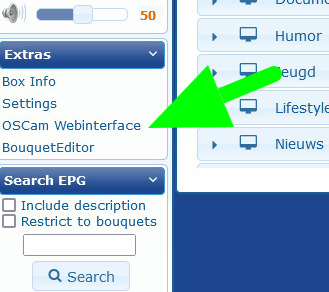
Access OScam webinterface
Of course OScam has to be installed, if so, the easiest way to access the OScam webinterface is using OpenWebif
