Difference between revisions of "Vu Multiboot"
(→Intro) |
(→Remove forever) |
||
| (56 intermediate revisions by 4 users not shown) | |||
| Line 1: | Line 1: | ||
| − | |||
| − | |||
=='''Intro'''== | =='''Intro'''== | ||
| − | With OpenPLi 9 we offer multiboot for all Vu<sup>+</sup> ''' | + | With OpenPLi 9 we offer multiboot for all Vu<sup>+</sup> '''4K''' receivers, so only the '''4K''' versions!!! So it's a Vu<sup>+</sup> '''4K''' receiver specific feature that makes it possible to install multiple images on your Vu<sup>+</sup> '''4K''' receiver. When you have activated this feature, you can install multiple images, how much images you can install, when it is supported, depends on the slots, let's say the partitions that become present.<br> Below we will explain how to activate this feature. |
| − | ==Initialize Vu<sup>+</sup> ''' | + | =='''Initialize Vu<sup>+</sup> 4K Multiboot'''== |
| − | By default Vu<sup>+</sup> ''' | + | By default Vu<sup>+</sup> '''4K''' Multiboot is not active, you have to activate or Initialize Multiboot. If you want multiboot, you go to '''Main menu > Setup > Flash image'''. Your receiver needs connection to the internet (never connect your receiver directly to internet! Always behind a firewall/Router). So if you receiver supports it, below in the screen you will see the option Initialize Multiboot (see below) |
| − | [[File: | + | [[File:VuMultiboot-001.jpg|centre|750px]]<br> |
| − | Now press the <span style="color:gold;font-size: 100%"> '''yellow button'''<span style="color:black;font-size: 100%"> and the screen below will appear. | + | Now press the <span style="color:gold;font-size: 100%"> '''yellow button'''<span style="color:black;font-size: 100%"> as pointed out in the picture above and the screen below will appear. |
| − | [[File: | + | [[File:VuMultiboot-002.jpg|centre|750px]]<br> |
Now you have tree choices, | Now you have tree choices, | ||
*press Exit on your remote control and nothing is changed, so no multiboot, | *press Exit on your remote control and nothing is changed, so no multiboot, | ||
| − | *Press the <span style="color:green;font-size: 100%"> '''Green button'''<span style="color:black;font-size: 100%"> and you will Init Multiboot | + | *Press the <span style="color:green;font-size: 100%"> '''Green button'''<span style="color:black;font-size: 100%"> and you will Init Multiboot, as shown in the picture below, please wait until your receiver reboots. |
| − | [[File: | + | [[File:VuMultiboot-003.jpg|centre|750px]] |
| − | + | *Press the <span style="color:red;font-size: 100%"> '''Red button'''<span style="color:black;font-size: 100%"> to completely remove the Multiboot option. when you do the screen below will appear. | |
| − | *Press the <span style="color:red;font-size: 100%"> '''Red button'''<span style="color:black;font-size: 100%"> to completely remove the Multiboot option. | + | [[File:VuMultiboot-004.jpg|centre|750px]]<br> |
| − | [[File: | + | Pressed the Remove forever (as you can see above) you can still abort removing the Multiboot by selecting '''No''' with your remote control. |
| − | Pressed the Remove forever you can still abort removing the Multiboot by selecting '''No''' with your remote control. | + | If you have pressed '''Yes''' and removed multiboot, please restart/reboot and after a restart the option "Initialize Multiboot" will be gone (see below). |
| − | + | [[File:VuMultiboot-005.jpg|centre|750px]] | |
| − | If you have pressed '''Yes''' and removed multiboot, please restart/reboot and after a restart the option will be gone (see below). | ||
| − | [[File: | ||
===Remove forever=== | ===Remove forever=== | ||
---- | ---- | ||
| − | Remove forever will of course only remove the multiboot feature from this particular image, so if you reconsider and want multiboot back, a flash will return the Multiboot feature. Remove forever will not be saved in your autobackup. | + | Remove forever will of course only remove the multiboot feature from this particular image, so if you reconsider and want multiboot back, a flash using an usb stick will return the Multiboot feature. Remove forever will not be saved in your autobackup. |
| − | |||
| − | ==Adding other OpenPLi versions or other images== | + | =='''Adding other OpenPLi versions or other images'''== |
| − | When you have multiboot you can install an image in every free slot (= partitions where you can install an image). In each slot you can install an OpenPLi version and there is the option | + | When you have multiboot you can install an image in every free slot (= partitions where you can install an image). In each slot you can install an OpenPLi version and there is the option to install OpenPLI with or without a backup. of course you can always install other images. |
| − | ==AutoBackup== | + | =='''AutoBackup'''== |
When you flash a multi boot version from the menu a backup is created and restored by default. When this flash process starts there is a time window to cancel it, so by default a backup is created from the current image and will be restored right after the flash on the newly installed image. In most cases and certainly when there is no HDD present, a USB stick with enough space, has to be plugged into the receiver so create the backup. These backup files are relatively small. In many cases it is best to use a USB stick of about 1 Gb, albeit to store the downloaded image. | When you flash a multi boot version from the menu a backup is created and restored by default. When this flash process starts there is a time window to cancel it, so by default a backup is created from the current image and will be restored right after the flash on the newly installed image. In most cases and certainly when there is no HDD present, a USB stick with enough space, has to be plugged into the receiver so create the backup. These backup files are relatively small. In many cases it is best to use a USB stick of about 1 Gb, albeit to store the downloaded image. | ||
| − | ==How to select an installed multiboot image== | + | =='''How to select an installed multiboot image'''== |
There are 2 ways to select the image to boot from. Using the remote control you simply press Menu and go into Standby/Restart menu. Press long on the power control button using your remote control a menu appears and as you can see in the picture below there is the "Multiboot image selector" option, once pressed it offers the images you have installed. | There are 2 ways to select the image to boot from. Using the remote control you simply press Menu and go into Standby/Restart menu. Press long on the power control button using your remote control a menu appears and as you can see in the picture below there is the "Multiboot image selector" option, once pressed it offers the images you have installed. | ||
| + | [[File:VuMultiboot-006.jpg|centre|750px]] | ||
| + | Now you can pick one and OpenPLi will boot into it. In the picture below only 1 is showed, as this is the one created after you initialized Multiboot. When you install more images these will also be displayed. | ||
| + | [[File:VuMultiboot-007.jpg|centre|750px]] | ||
| − | |||
| + | When there are more images installed there is also the possibility by pressing <span style="color:gold;font-size: 100%"> '''yellow button'''<span style="color:black;font-size: 100%"> to remove an image. See picture below. | ||
| + | [[File:VuMultiboot-008.jpg|centre|750px]] | ||
| − | + | Once you remove an image, the <span style="color:gold;font-size: 100%"> '''yellow button'''<span style="color:black;font-size: 100%"> changes to restore deleted images, in case you made a mistake. Even when you reboot you can restore deleted images, once you install a new one it the "old slot" it will be gone! | |
| + | =='''Adding other images than OpenPLi'''== | ||
| + | If you want to add any other images, well other than OpenPLi, you can also flash them using the other images button, see pictures below. This will open the option to choose other brands. | ||
| + | [[File:VuMultiboot-009.jpg|centre|750px]] | ||
| − | |||
| − | ==''' | + | [[File:VuMultiboot-010.jpg|centre|750px]] |
| − | If you want to | + | |
| − | + | =='''Forced loading recovery image'''== | |
| − | of | + | The first image, the one in which you activated multi boot is called "the recovery image" is in slot 0. If you for some reason, you want to boot not from the menu using the multiboot image selector (see pictures above), then create an empty STARTUP_RECOVERY file at the root of you HHD/USB drive and hold de Power button for more than 12 seconds for reboot receiver. |
| + | |||
| + | =='''Multiboot images missing after an update?'''== | ||
| + | Under specific circumstances, it is possible to break the VU+ Kexec multiboot. This happens when the update contains a new kernel-image package, which gets installed in flash instead of in the current multiboot slot, if the image isn't built multiboot aware. | ||
| + | When this happens, the box will reboot into slot 0 (the original images flashed), the multiboot images will be gone, and Enigma will crash if you attempt to reinstall or reactivate multiboot. | ||
| + | |||
| + | However, not all is lost, and with a bit of commandline magic, you can restore the multiboot functionality without loss of data. | ||
| + | |||
| + | === Before you start === | ||
| + | |||
| + | It is recommended to make backups of your multiboot slots first, before you start restoring the multiboot kernel. This way, if the box won't boot after attempting the restore, you can always fall back to flashing the box via USB, install and activate multiboot again, and then restore your backups. | ||
| + | |||
| + | To make this backup, you need access to the commandline, so login using SSH or telnet. Then execute one of the following commands: | ||
| + | * <code>tar -cvzf /media/hdd/linuxrootfs1.tar.gz /linuxrootfs1</code> (for slot 1) | ||
| + | * <code>tar -cvzf /media/hdd/linuxrootfs2.tar.gz /linuxrootfs2</code> (for slot 2) | ||
| + | * <code>tar -cvzf /media/hdd/linuxrootfs3.tar.gz /linuxrootfs3</code> (for slot 3) | ||
| + | ( if you don't want to use or don't have a local disk, change <code>/media/hdd</code> in these commands to your desired storage location. You need about 4GB of free space ) | ||
| + | |||
| + | === Reinstall the kexec multiboot kernel === | ||
| + | |||
| + | Follow these steps, once you've booted slot 0, and logged in: | ||
| + | * execute the following command: ''opkg install vuplus-kexec --force-reinstall'' | ||
| + | * for the '''VU+ Zero 4K''', execute the following command: <code>dd if=/usr/bin/kernel_auto.bin of=/dev/mmcblk0p4</code> | ||
| + | * for the '''VU+ Solo 4K''', execute the following command: <code>dd if=/usr/bin/kernel_auto.bin of=/dev/mmcblk0p1</code> | ||
| + | * for the '''VU+ Uno 4K''', execute the following command: <code>dd if=/usr/bin/kernel_auto.bin of=/dev/mmcblk0p1</code> | ||
| + | * for the '''VU+ Duo 4K''', execute the following command: <code>dd if=/usr/bin/kernel_auto.bin of=/dev/mmcblk0p6</code> | ||
| + | * for the '''VU+ Ultimo 4K''', execute the following command: <code>dd if=/usr/bin/kernel_auto.bin of=/dev/mmcblk0p1</code> | ||
| + | * for the '''VU+ Uno 4K SE''', execute the following command: <code>dd if=/usr/bin/kernel_auto.bin of=/dev/mmcblk0p1</code> | ||
| + | * for the '''VU+ Duo 4K SE''', execute the following command: <code>dd if=/usr/bin/kernel_auto.bin of=/dev/mmcblk0p6</code> | ||
| + | * execute the following command: <code>mv /usr/bin/STARTUP.cpio.gz /STARTUP.cpio.gz</code> | ||
| + | * <code>reboot</code> | ||
| + | |||
| + | === Plan B === | ||
| + | |||
| + | If the above doesn't give you a working box back, with all our multiboot slots exactly as they were, it is time for plan B. | ||
| + | |||
| + | If you followed the recommendation and made a backup first, that is. If you did, follow these steps: | ||
| + | * reflash the STB via USB, with the image you want to be used as slot 0. We advise to use OpenPLi, as it is one of the smallest available. | ||
| + | * after the image boots up, install and activate multiboot again. The box will restart after this. | ||
| + | * use telnet to connect (SSH won't work on newly flashed images without password), and restore your backups: | ||
| + | * <code>tar -xvzf /media/hdd/linuxrootfs1.tar.gz -C /</code> (for slot 1) | ||
| + | * <code>tar -xvzf /media/hdd/linuxrootfs2.tar.gz -C /</code> (for slot 2) | ||
| + | * <code>tar -xvzf /media/hdd/linuxrootfs3.tar.gz -C /</code> (for slot 3) | ||
| + | * <code>reboot</code> | ||
| + | |||
| + | The box should now restart the image in slot 0, and your multiboot slots should be available for selection again. | ||
| − | + | '''NB''': Be VERY careful when typing in these commands. A simple typo can spell disaster and may result in you having to start from scratch again, with the loss of your multiboot slots. It is advised to use copy/paste to make sure you don't make any mistakes while typing. | |
| − | |||
Latest revision as of 13:59, 8 April 2025
Contents
Intro
With OpenPLi 9 we offer multiboot for all Vu+ 4K receivers, so only the 4K versions!!! So it's a Vu+ 4K receiver specific feature that makes it possible to install multiple images on your Vu+ 4K receiver. When you have activated this feature, you can install multiple images, how much images you can install, when it is supported, depends on the slots, let's say the partitions that become present.
Below we will explain how to activate this feature.
Initialize Vu+ 4K Multiboot
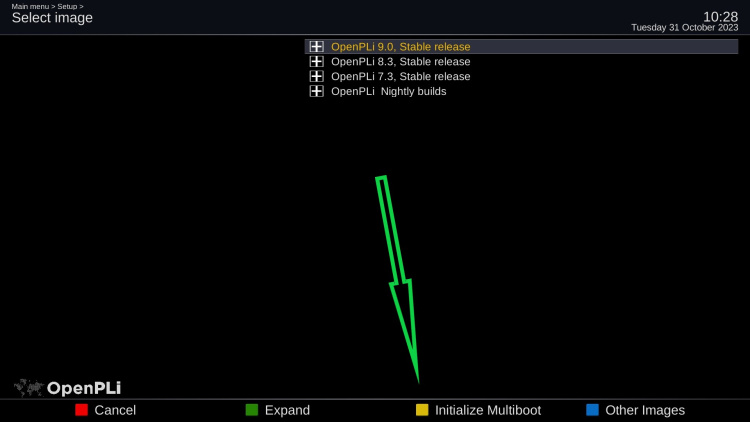
By default Vu+ 4K Multiboot is not active, you have to activate or Initialize Multiboot. If you want multiboot, you go to Main menu > Setup > Flash image. Your receiver needs connection to the internet (never connect your receiver directly to internet! Always behind a firewall/Router). So if you receiver supports it, below in the screen you will see the option Initialize Multiboot (see below)
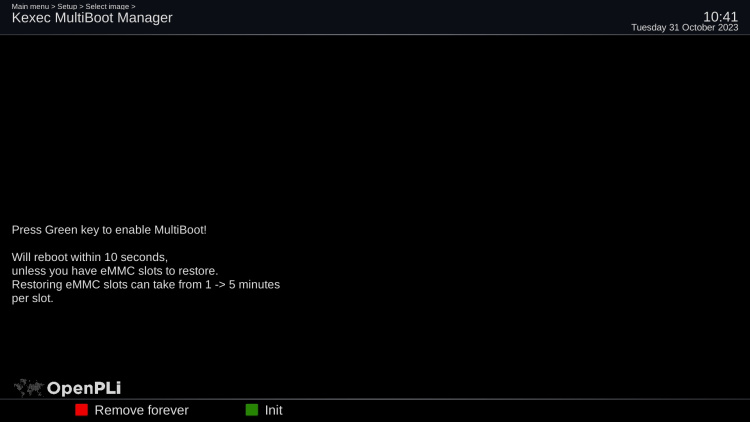
Now press the yellow button as pointed out in the picture above and the screen below will appear.
Now you have tree choices,
- press Exit on your remote control and nothing is changed, so no multiboot,
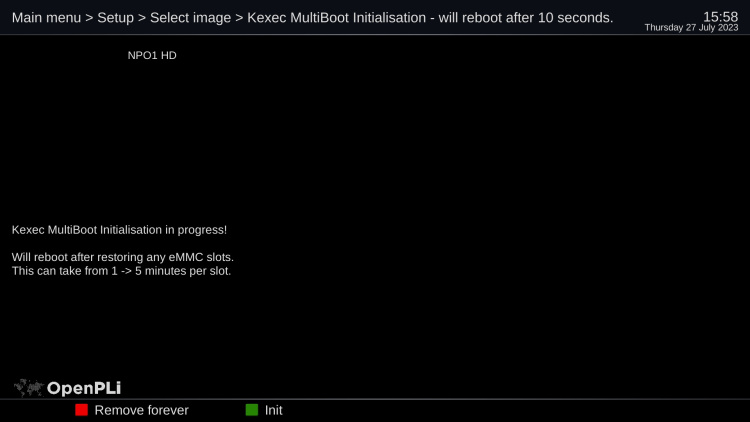
- Press the Green button and you will Init Multiboot, as shown in the picture below, please wait until your receiver reboots.
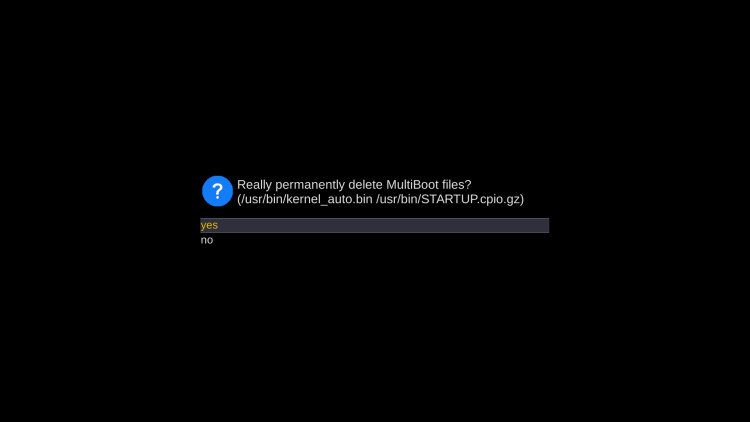
- Press the Red button to completely remove the Multiboot option. when you do the screen below will appear.
Pressed the Remove forever (as you can see above) you can still abort removing the Multiboot by selecting No with your remote control. If you have pressed Yes and removed multiboot, please restart/reboot and after a restart the option "Initialize Multiboot" will be gone (see below).
Remove forever
Remove forever will of course only remove the multiboot feature from this particular image, so if you reconsider and want multiboot back, a flash using an usb stick will return the Multiboot feature. Remove forever will not be saved in your autobackup.
Adding other OpenPLi versions or other images
When you have multiboot you can install an image in every free slot (= partitions where you can install an image). In each slot you can install an OpenPLi version and there is the option to install OpenPLI with or without a backup. of course you can always install other images.
AutoBackup
When you flash a multi boot version from the menu a backup is created and restored by default. When this flash process starts there is a time window to cancel it, so by default a backup is created from the current image and will be restored right after the flash on the newly installed image. In most cases and certainly when there is no HDD present, a USB stick with enough space, has to be plugged into the receiver so create the backup. These backup files are relatively small. In many cases it is best to use a USB stick of about 1 Gb, albeit to store the downloaded image.
How to select an installed multiboot image
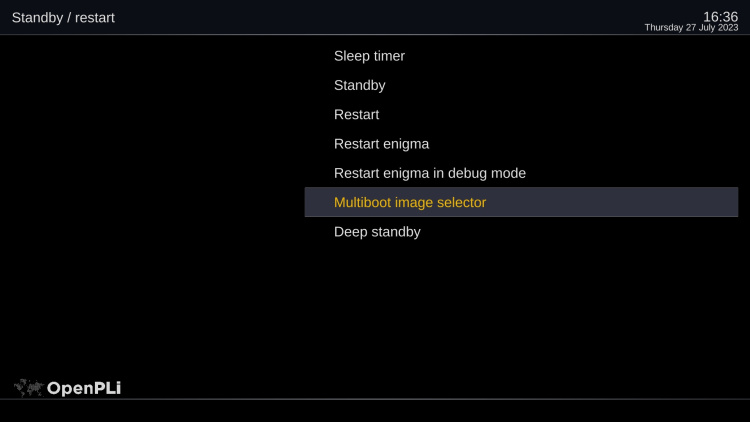
There are 2 ways to select the image to boot from. Using the remote control you simply press Menu and go into Standby/Restart menu. Press long on the power control button using your remote control a menu appears and as you can see in the picture below there is the "Multiboot image selector" option, once pressed it offers the images you have installed.
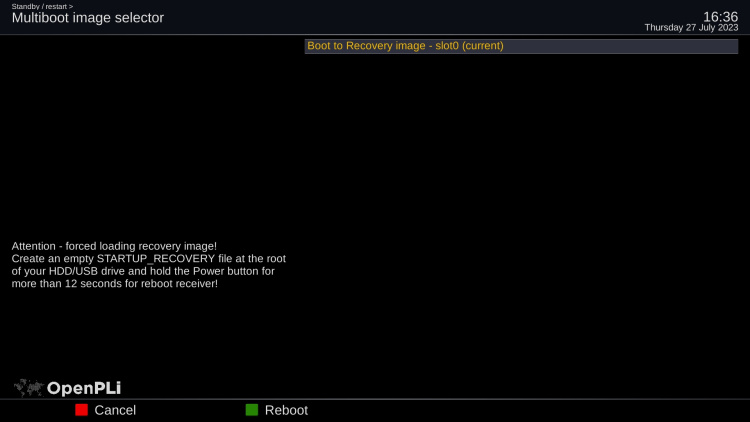
Now you can pick one and OpenPLi will boot into it. In the picture below only 1 is showed, as this is the one created after you initialized Multiboot. When you install more images these will also be displayed.
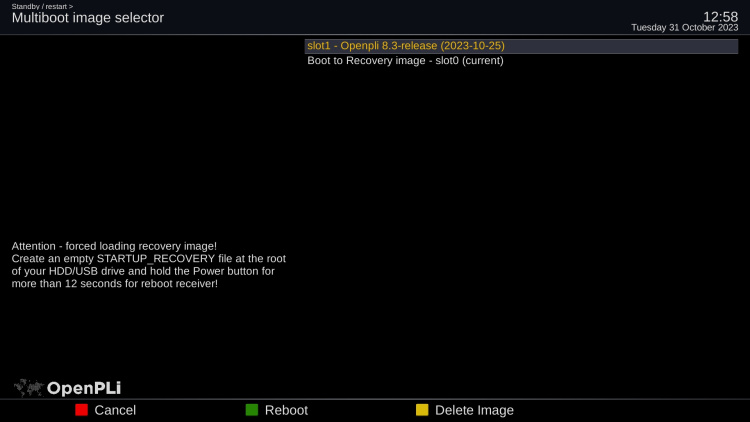
When there are more images installed there is also the possibility by pressing yellow button to remove an image. See picture below.
Once you remove an image, the yellow button changes to restore deleted images, in case you made a mistake. Even when you reboot you can restore deleted images, once you install a new one it the "old slot" it will be gone!
Adding other images than OpenPLi
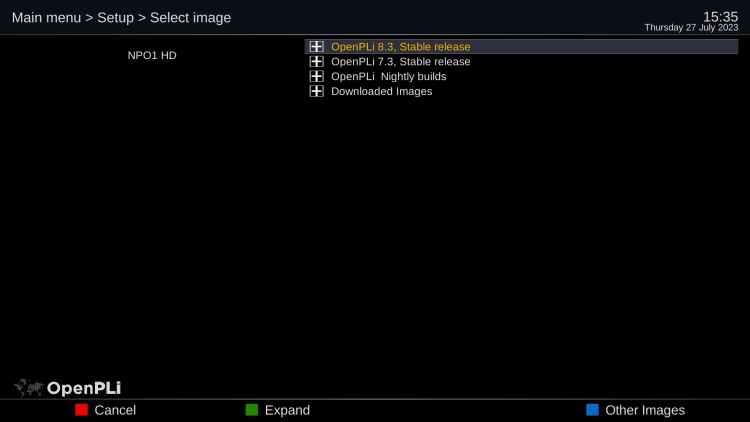
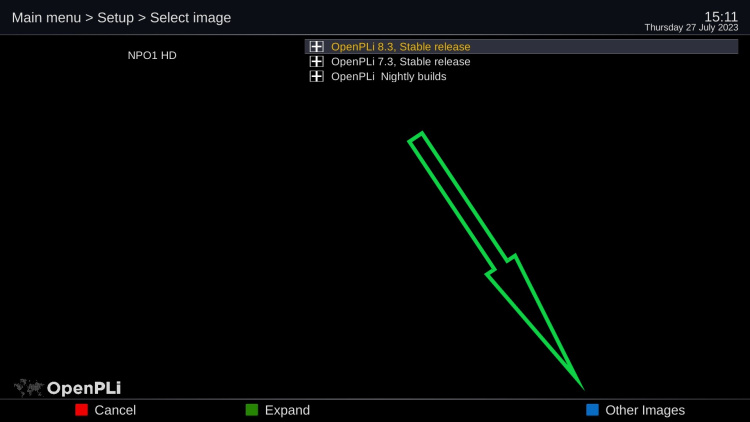
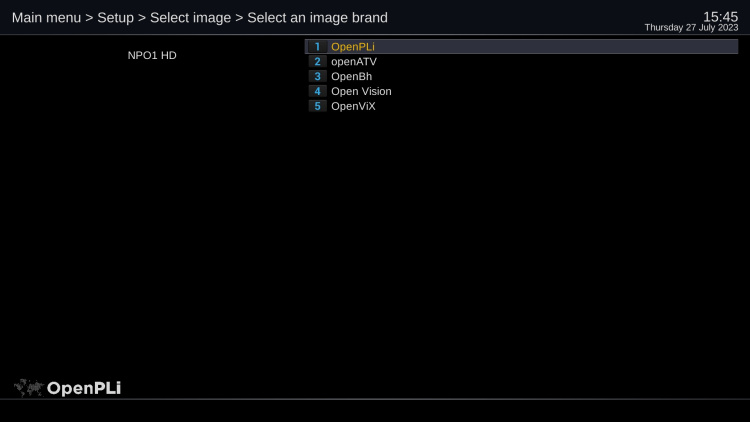
If you want to add any other images, well other than OpenPLi, you can also flash them using the other images button, see pictures below. This will open the option to choose other brands.
Forced loading recovery image
The first image, the one in which you activated multi boot is called "the recovery image" is in slot 0. If you for some reason, you want to boot not from the menu using the multiboot image selector (see pictures above), then create an empty STARTUP_RECOVERY file at the root of you HHD/USB drive and hold de Power button for more than 12 seconds for reboot receiver.
Multiboot images missing after an update?
Under specific circumstances, it is possible to break the VU+ Kexec multiboot. This happens when the update contains a new kernel-image package, which gets installed in flash instead of in the current multiboot slot, if the image isn't built multiboot aware. When this happens, the box will reboot into slot 0 (the original images flashed), the multiboot images will be gone, and Enigma will crash if you attempt to reinstall or reactivate multiboot.
However, not all is lost, and with a bit of commandline magic, you can restore the multiboot functionality without loss of data.
Before you start
It is recommended to make backups of your multiboot slots first, before you start restoring the multiboot kernel. This way, if the box won't boot after attempting the restore, you can always fall back to flashing the box via USB, install and activate multiboot again, and then restore your backups.
To make this backup, you need access to the commandline, so login using SSH or telnet. Then execute one of the following commands:
-
tar -cvzf /media/hdd/linuxrootfs1.tar.gz /linuxrootfs1(for slot 1) -
tar -cvzf /media/hdd/linuxrootfs2.tar.gz /linuxrootfs2(for slot 2) -
tar -cvzf /media/hdd/linuxrootfs3.tar.gz /linuxrootfs3(for slot 3)
( if you don't want to use or don't have a local disk, change /media/hdd in these commands to your desired storage location. You need about 4GB of free space )
Reinstall the kexec multiboot kernel
Follow these steps, once you've booted slot 0, and logged in:
- execute the following command: opkg install vuplus-kexec --force-reinstall
- for the VU+ Zero 4K, execute the following command:
dd if=/usr/bin/kernel_auto.bin of=/dev/mmcblk0p4 - for the VU+ Solo 4K, execute the following command:
dd if=/usr/bin/kernel_auto.bin of=/dev/mmcblk0p1 - for the VU+ Uno 4K, execute the following command:
dd if=/usr/bin/kernel_auto.bin of=/dev/mmcblk0p1 - for the VU+ Duo 4K, execute the following command:
dd if=/usr/bin/kernel_auto.bin of=/dev/mmcblk0p6 - for the VU+ Ultimo 4K, execute the following command:
dd if=/usr/bin/kernel_auto.bin of=/dev/mmcblk0p1 - for the VU+ Uno 4K SE, execute the following command:
dd if=/usr/bin/kernel_auto.bin of=/dev/mmcblk0p1 - for the VU+ Duo 4K SE, execute the following command:
dd if=/usr/bin/kernel_auto.bin of=/dev/mmcblk0p6 - execute the following command:
mv /usr/bin/STARTUP.cpio.gz /STARTUP.cpio.gz -
reboot
Plan B
If the above doesn't give you a working box back, with all our multiboot slots exactly as they were, it is time for plan B.
If you followed the recommendation and made a backup first, that is. If you did, follow these steps:
- reflash the STB via USB, with the image you want to be used as slot 0. We advise to use OpenPLi, as it is one of the smallest available.
- after the image boots up, install and activate multiboot again. The box will restart after this.
- use telnet to connect (SSH won't work on newly flashed images without password), and restore your backups:
-
tar -xvzf /media/hdd/linuxrootfs1.tar.gz -C /(for slot 1) -
tar -xvzf /media/hdd/linuxrootfs2.tar.gz -C /(for slot 2) -
tar -xvzf /media/hdd/linuxrootfs3.tar.gz -C /(for slot 3) -
reboot
The box should now restart the image in slot 0, and your multiboot slots should be available for selection again.
NB: Be VERY careful when typing in these commands. A simple typo can spell disaster and may result in you having to start from scratch again, with the loss of your multiboot slots. It is advised to use copy/paste to make sure you don't make any mistakes while typing.
