Difference between revisions of "Data sharing"
(→OpenPLi to OpenPLi) |
(→OpenPLi to OpenPLi) |
||
| (3 intermediate revisions by the same user not shown) | |||
| Line 65: | Line 65: | ||
==='''OpenPLi to OpenPLi'''=== | ==='''OpenPLi to OpenPLi'''=== | ||
---- | ---- | ||
| − | |||
| − | |||
When you have OpenPLi installed on 2 boxes, you can make a NFS share, <span style="color:Red;font-size: 100%">'''WARNING!!'''<span style="color:black;font-size: 100%"> you will have to edit on the command line. If can't do this, then stay away from a NFS share between to OpenPLi machines and use a CIFS share instead!! | When you have OpenPLi installed on 2 boxes, you can make a NFS share, <span style="color:Red;font-size: 100%">'''WARNING!!'''<span style="color:black;font-size: 100%"> you will have to edit on the command line. If can't do this, then stay away from a NFS share between to OpenPLi machines and use a CIFS share instead!! | ||
Go to the OpenPLi machine (the server) where the data is you want to share and do as following: | Go to the OpenPLi machine (the server) where the data is you want to share and do as following: | ||
| − | # To configure the OpenPLi server machine, first install the plugin NFSserver | + | # To configure the OpenPLi server machine, first install the plugin NFSserver from the Extensions section in the [[Plugin_Wiki|Plugin Manager]] |
# Now go to | # Now go to | ||
#: /etc | #: /etc | ||
| Line 86: | Line 84: | ||
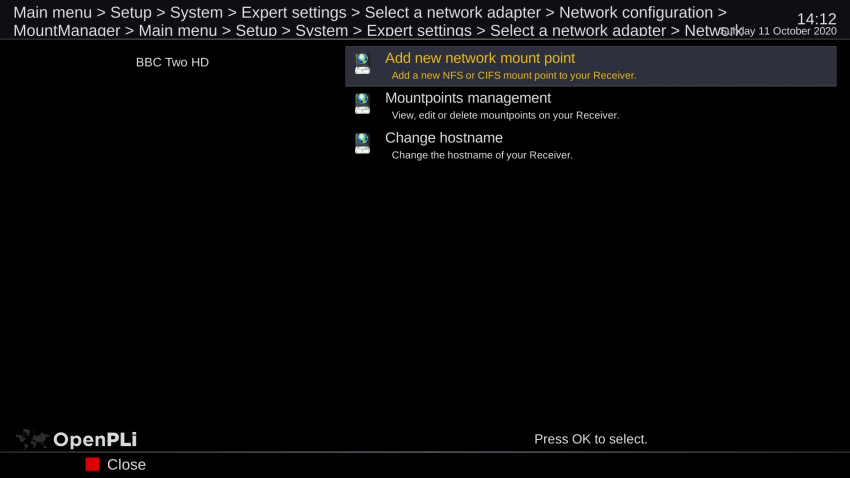
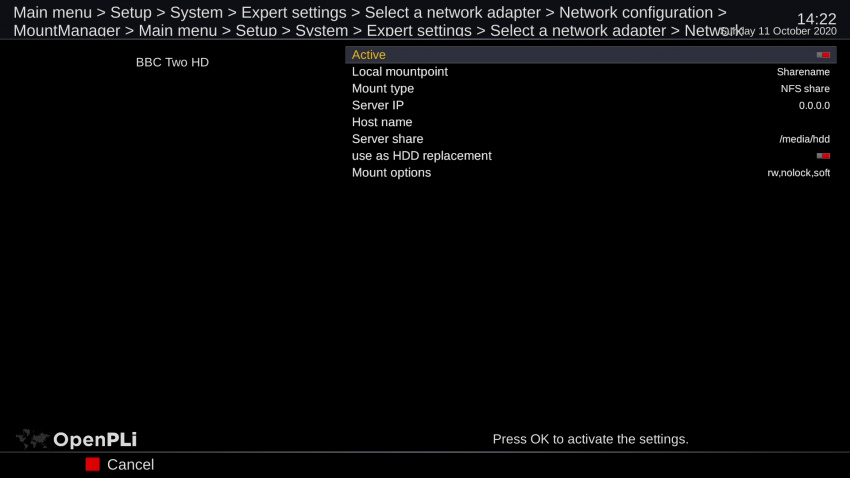
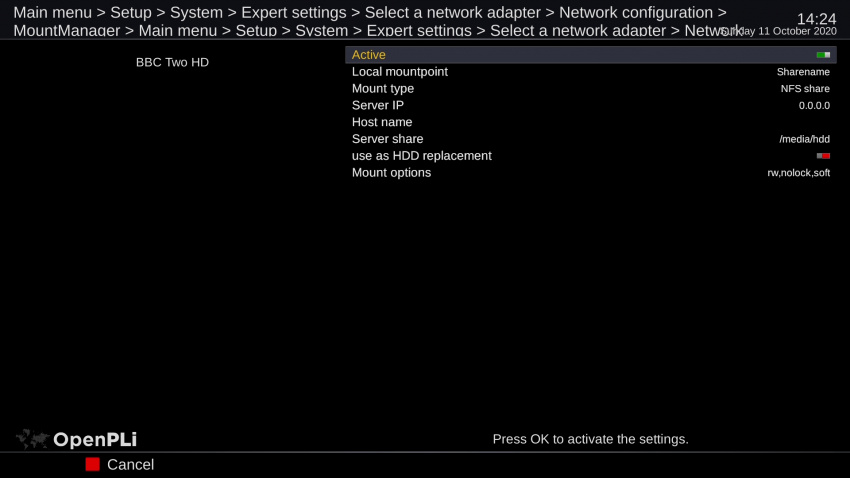
Then on the client box go to '''Menu > Setup > System > Expert settings > Network > MountManager''' and choose ''Add new network mount point''. Here you will have to adjust 7 settings in order to make the connection a success. | Then on the client box go to '''Menu > Setup > System > Expert settings > Network > MountManager''' and choose ''Add new network mount point''. Here you will have to adjust 7 settings in order to make the connection a success. | ||
| + | |||
| + | [[File:MountManager-005.jpg|frameles|left|600px]] | ||
| + | [[File:MountManager-006.jpg|frameles|centre|600px]] | ||
| + | |||
#'''Active''' set it to Enable | #'''Active''' set it to Enable | ||
Latest revision as of 11:50, 12 July 2024
Contents
Intro
Basically, if you want to share data in a computer network, there is a server and a client side or many clients. On de server side there needs to be a protocol that the client understands. Here you will have to choose between the NFS or CIFS (SMB/Samba) protocol to able to access the machine you want to connect to. If you want OpenPLi to access or store data on another machine in your network, you will need to add a new network mount point, this can be done in OpenPLi using the MountManager (see below). Here you will have to choose between the NFS or CIFS protocol to able to access the machine you want to connect to.
NOTE: When you create a new mount using mount manager as described below and save it, it is by default disabled!!
Background on NFS and CIFS (Samba/SMB)
NFS and CIFS are protocols to make a (data)connection between server and client.
NFS
NFS stands for Network File system and was created in 1984 by Sun Microsystems and (were) used for their Unix workstations.
CIFS
CIFS stands for Common Internet File System and was developed by Microsoft. It’s a kind of dialect of SMB (Samba) most people use these two SMB/CIFS together, but although they are different, they play well together. In comparison to NFS, CIFS tends to be a bit more "chatty" in its communication.
Autodetection
As of OpenPLi 7.2 CIFS config has SMB version and security protocol autodetection, so that you no longer have to start looking for whether options have to be given, they are now entered automatically, so practically it means that the suggestions below should not be needed anymore, the system will try all options until one setting works!!
No more guest access without password
As of OpenPLi 8.2 there is no more guest access without a password possible, this is because modern OS's are not allowing this any more.
If you have this in use, please change the mount definition, entering "guest" for username and/or password instead of leaving it blank, BEFORE you upgrade to OpenPLi 8.2 (or flash it and restoring old configuration).
If you don't, your box will hang after the start, until the mount attempt times out, which can take a long time (10 minutes or more).
Which protocol to use
Oversimplified you could say that you choose NFS between Unix/Linux machines and CIFS between Windows and Unix/Linux machines.
Using CIFS to connect to a Linux machine
Please note that if you are using CIFS to connect to a Linux machine, make sure you specify the correct "iocharset" in the mount options (iocharset=utf8), because CIFS makes the assumption that the other side is Windows.
How to start
When you want to use NFS to access an OpenPLi box you will have to install "NFS server" on the server side. From the plugins, it is in de "extensions" section. If you want to access this new NFS server receiver from another OpenPLi receiver (the Client) you will need to configure the client using "MountManager" as explained below under NFS.
When you want to use CIFS (SMB/Samba) to access and OpenPLi box, you don't have to do anything on the server side, as CIFS is already "working". If you want to access this CIFS server receiver from another OpenPLi receiver (the Client) you will need to configure the client using "MountManager" as explained below under CIFS.
When you add the server share, so like the location on a NAS you want access, there is a difference in the notation. For example if you want to access a shared folder named video on your Synology NAS which has a volume1, then with
NFS the Server share is:
/volume1/video
CIFS the Server share is
/video
When CIFS is not working
Old method (Only needed for versions of OpenPLi 7.1 and below)
If you can't create a mount, than some security settings may be not up-to-date. Maybe you are still using Samba version 1.0. Although you can make it work, remember still running Samba using version 1 can be a security risk. Follow this link if you are sure that still using Samba version 1.0 is not a security risk for you.
NFS
OpenPLi to OpenPLi
When you have OpenPLi installed on 2 boxes, you can make a NFS share, WARNING!! you will have to edit on the command line. If can't do this, then stay away from a NFS share between to OpenPLi machines and use a CIFS share instead!!
Go to the OpenPLi machine (the server) where the data is you want to share and do as following:
- To configure the OpenPLi server machine, first install the plugin NFSserver from the Extensions section in the Plugin Manager
- Now go to
- /etc
- Edit the file "exports" and make it look something like
- /media/hdd 192.168.5.0/24(rw,no_root_squash,sync)
- or
- /media/usb 192.168.5.0/24(rw,no_root_squash,sync)
- The line /media/usb is the location you want to share (can of course be any location on this machine) and 192.168.5.0/24 means that the whole range 192.168.5.0-255 has/can access (to) that share.
- Save the file and make it effective with the command
exportfs -r
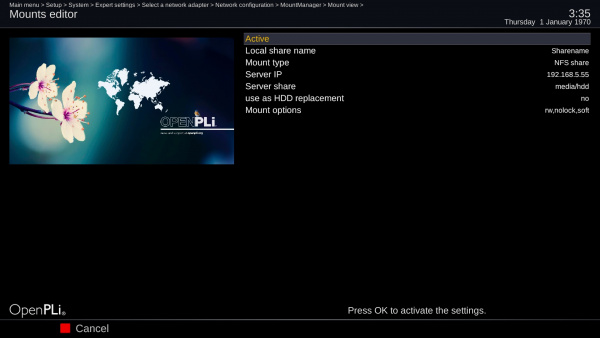
Then on the client box go to Menu > Setup > System > Expert settings > Network > MountManager and choose Add new network mount point. Here you will have to adjust 7 settings in order to make the connection a success.
- Active set it to Enable
- Local share name set it to any name you like (here I leave it as Sharename). It's the name you will see in OpenPLi when the share is a success.
- Mount type set it to NFS
- Server IP here you enter the IP Address of the machine you want to connect to, remember it should be a static or reserved one (meaning it does not change when this machine goes on or off)
- Server share if you haven't anything regarding the recording location then leave it at default so /media/hdd or /media/usb.
- Use as HDD replacement if you want this choose, yes else no
- Mount options leave it as it is.
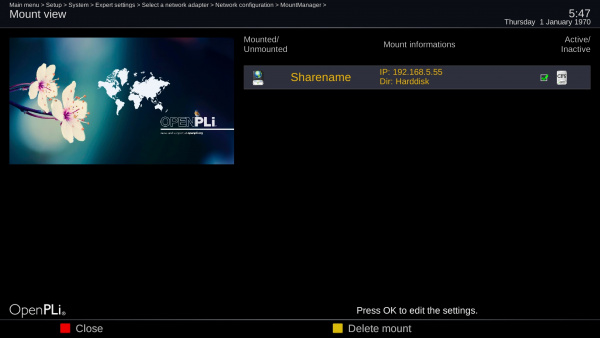
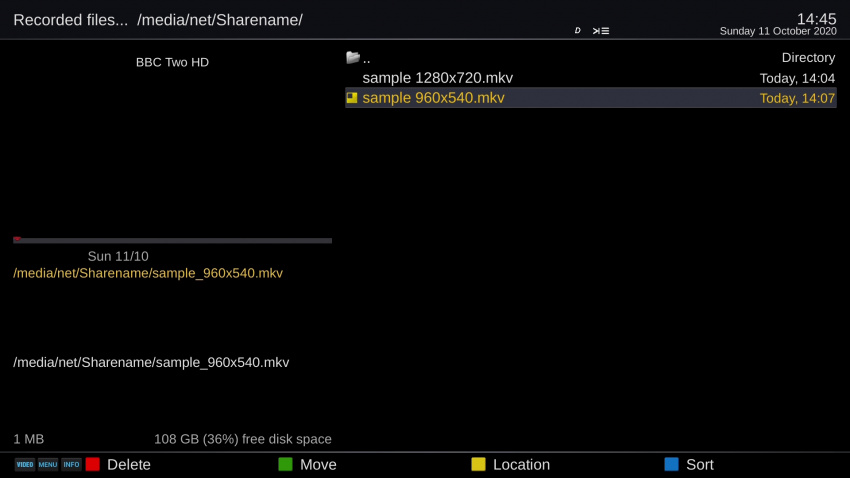
Now save these settings by pressing OK on your remote. When this done go to Menu > Setup > System > Expert settings > Network > MountManager and then choose Mountpoints management. You should see something like this and you can access the data in this shared.
OpenPLi to NAS
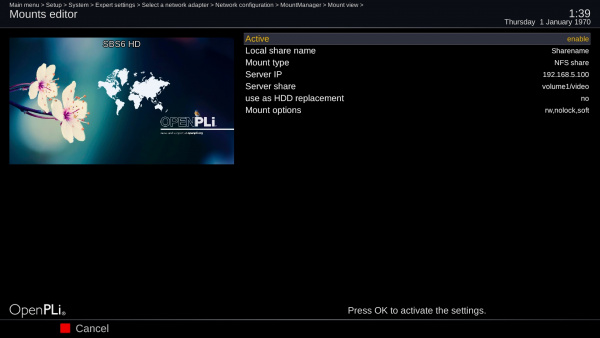
I assume the NAS uses a Linux distribution. Which is in most cases true, as Linux is free and that's favorable to manufacturer's business model. First you’ll have to set things right on the server side (NAS), check if NFS is active and grant the ip address of your OpenPLi box access to the NAS in the NFS settings of the NAS. When this is done In OpenPLi go to Menu > Setup > System > Expert settings > Network > MountManager and then choose Add new network mount point. Here you will have to adjust 7 settings in order to make the connection a success.
- Active set it to Enable
- Local share name set it to any name you like (here I leave it as Sharename). It's the name you will see in OpenPLi when the share is a success.
- Mount type set it to NFS
- Server IP here you enter the IP Address of the machine you want to connect to, remember it should be a static or reserved one (meaning it does not change when this machine goes on or off)
- Server share here you will have to enter the exact name of the path to the folder/directory on the machine you want to access. Notice and take look at the pictures NFS has a different path that CIFS, although NFS and CIFS where setup to the same machine!
- Use as HDD replacement if you want this, choose yes else no
- Mount options mostly you can leave this as it is.
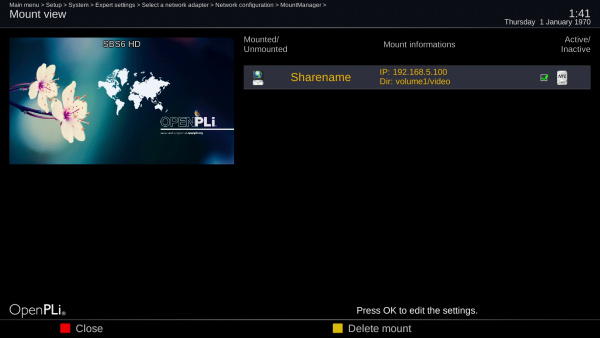
Now save these settings by pressing OK on your remote. When this done go to Menu > Setup > System > Expert settings > Network > MountManager and then choose Mountpoints management. You should see something like this and you can access the data.
CIFS
OpenPLi to OpenPLi
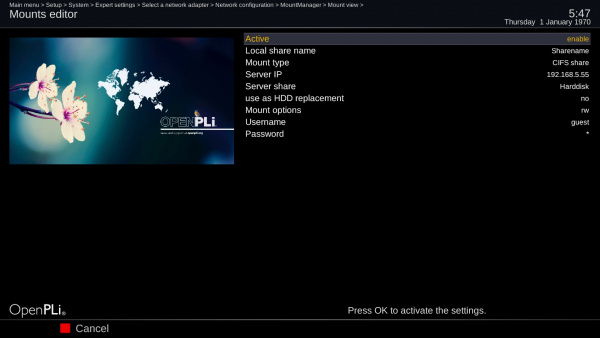
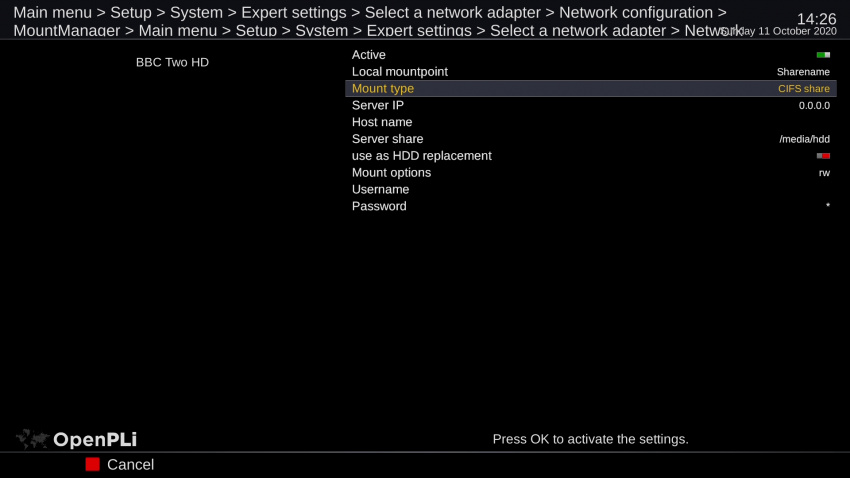
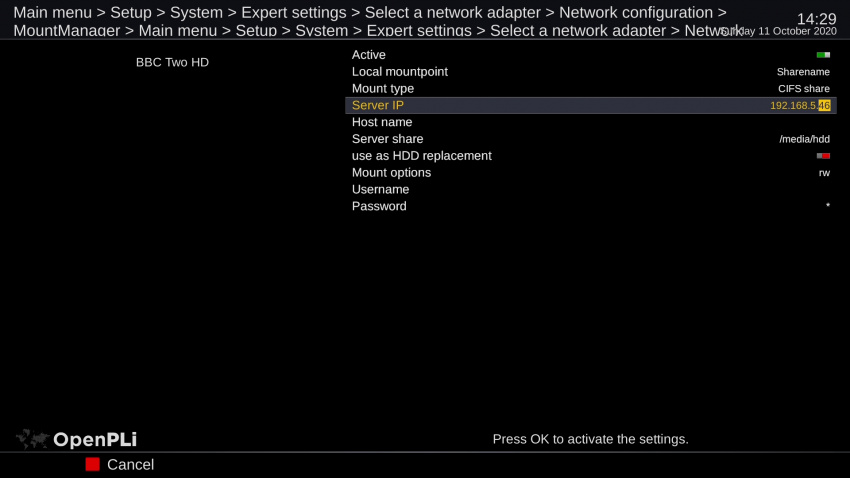
Go to the OpenPLi box that will be the client, meaning the box that wants to have access to another OpenPLi receiver, then go to Menu > Setup > System > Expert settings > Network > MountManager and then choose Add new network mount point. Here you will have to adjust 9 settings in order to make the connection a success.
- Active set it to Enable
- Local share name set it to any name you like (here I leave it as Sharename). It's the name you will see in OpenPLi when the share is a success.
- Mount type set it to CIFS
- Server IP here you enter the IP Address of the machine you want to connect to, remember it should be a static or reserved one (meaning it does not change when this machine goes on or off)
- Server share here you will have to enter the exact name of the path to the folder/directory on the machine you want to access.
- Use as HDD replacement if you want this, choose yes else no
- Mount options mostly you can leave this as it is.
- User name default is guest, leave it at that, CIFS guest mounts without username/password no longer work as of OpenPLi 8.2, see here for more information
- Password default is *, leave it at that, CIFS guest mounts without username/password no longer work as of OpenPLi 8.2, see here for more information
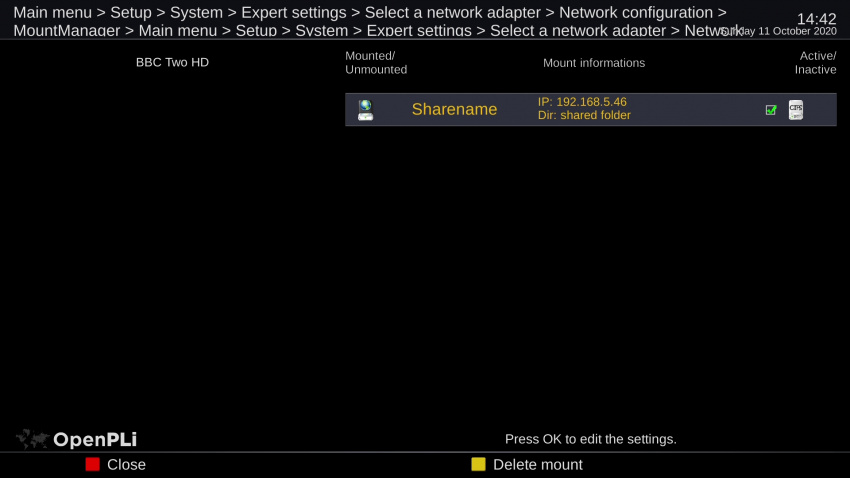
Now save these settings by pressing OK on your remote. When this done go to Menu > Setup > System > Expert settings > Network > MountManager and then choose Mountpoints management. You should see something like this and you can access the data.
OpenPLi to NAS
On the NAS check if SMB/CIFS is active and give access to a username and password or give guest access. Next go to the OpenPLi box and go to Menu > Setup > System > Expert settings > Network > MountManager and then choose Add new network mount point. Here you will have to adjust 9 settings in order to make the connection a success.
- Active set it to Enable
- Local share name set it to any name you like (here I leave it as Sharename). It's the name you will see in OpenPLi when the share is a success.
- Mount type set it to CIFS
- Server IP here you enter the IP Address of the machine you want to connect to, remember it should be a static or reserved one (meaning it does not change when this machine goes on or off)
- Server share here you will have to enter the exact name of the path to the folder/directory on the machine you want to access. Notice and take look at the pictures CIFS has a different path than NFS, although NFS and CIFS where setup to the same machine!
- Use as HDD replacement if you want this, choose yes else no
- Mount options mostly you can leave this as it is.
- User name default is guest, leave it at that
- Password default is *, leave it at that
Now save these settings by pressing OK on your remote. When this done go to Menu > Setup > System > Expert settings > Network > MountManager and then choose Mountpoints management. You should see something like this and you can access the data.
OpenPLi to a Windows computer
Here is explained how to access/add a shared folder that's on a Windows PC
On the Windows machine
In Windows you need to create a shared folder, you can do that for guest or everyone and choose to have passwords or not. After you created the shared folder with or without username or password, you will have to enter these in OpenPLi, you will also need the IP address of the Windows machine and the folder that you shared, so write these down.
On the OpenPLi receiver
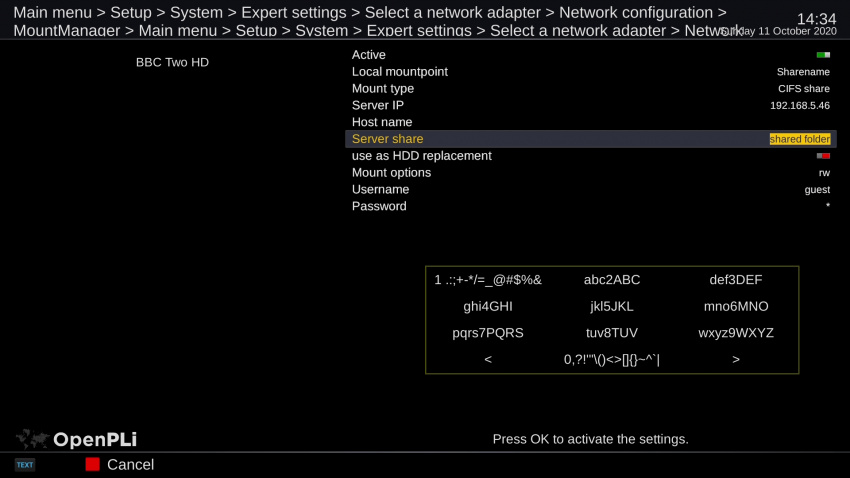
1.Use your remote control and go to Main menu > Setup > System > Expert settings > Network > MountManager
2.Add new network mount point
3. Active: change the slider to green
4.Local mountpoint: Leave this as it is (you can change this later if you want)
5.Mount type: Change it from NFS to CIFS (arrow to the left)
6.Server IP: Enter the ip address of your Windows computer
7.Hostname: Leave this as it is, so empty
8.Server share: this is the name of the folder you shared on your Windows PC. Keep in mind that when the shared folder is in
/folder/shared folder
you only have to enter
shared folder
so not the complete path (This is a Windows thingy ;))
9.Username: When you have created a windows share with a username enter this, when you have set windows share without a username then leave this as it is, so guest
10.Password: When you have created a windows share with a password enter this, when you have set windows share without a password then leave this as it is, so *
12.Exit the mount manager and press the PVR or the Playlist on your remote (will be different per receiver or remote) and now you should be able to see the files on the Windows PC, please remember that not all files types can be displayed, as your receiver is a Linux machine accessing a Windows machine, but most movie file types should be recognized.
