Difference between revisions of "Installation"
(→AutoBackup) |
(→Download section) |
||
| (64 intermediate revisions by 2 users not shown) | |||
| Line 1: | Line 1: | ||
==Installing OpenPLi (Flashing)== | ==Installing OpenPLi (Flashing)== | ||
| − | When you want to install OpenPLi on your receiver/box/STB, you can do this by using an USB stick with a image (=installation files), which you | + | When you want to install OpenPLi on your receiver/box/STB, you can do this by using an USB stick with a image (=installation files), which you download from the [http://openpli.org/download <span style="color:SteelBlue">download section</span>]. This procedure or method is called ''flashing''. The instruction how to flash a certain type of receiver can be found in the [[Supported Receivers | <span style="color:SteelBlue">Supported Receivers</span>]] section of the Wiki. |
===Download section=== | ===Download section=== | ||
| − | In the [http://openpli.org/download <span style="color:SteelBlue">download section</span>] you can find the latest firmware images for your receiver. The current development strategy consists of | + | ---- |
| + | In the [http://openpli.org/download <span style="color:SteelBlue">download section</span>] you can find the latest firmware images for your receiver. The current development strategy consists of 2 different versions: | ||
| + | #<u>Development.</u> (Nightly Build) Images created from the latest development codebase. These are for developers only, unstable, and may break at any point. <s>These versions are not released to the public.</s> At current the strategy has changed and develop is released to the public, but remember these are not thoroughly tested and can break down at any moment. | ||
| + | #<s><u>Release candidate.</u> These are precursors to a stable release, used for final public testing before creating a stable release. Only use if you want to test and report back issues to the forum.</s> At current (OpenPLi > 8.0) develop/Nightly Build is released for anyone to test and as such there are no more release candidates. | ||
#<u>Stable release.</u> This version is deemed suitable for every day use, even if you are a novice or not technically savvy. | #<u>Stable release.</u> This version is deemed suitable for every day use, even if you are a novice or not technically savvy. | ||
| − | |||
| − | |||
<u>''Stable releases are supported for endusers, through the support section on our forums website and is the one we recommend you should choose.''</u> | <u>''Stable releases are supported for endusers, through the support section on our forums website and is the one we recommend you should choose.''</u> | ||
| − | ==Flash from the Menu== | + | ==Flash from the Menu (FlashImage support)== |
| − | As of OpenPLi 6.1 there is the possibility | + | As of OpenPLi 6.1 there is the possibility to flash your receiver from the menu to another version, (see animation below). Remember this is a flash, not an upgrade. |
| + | |||
| + | [[File:Flash_Procedure-003.jpg|Left|720px]] | ||
| + | |||
| + | As in the picture above you first choose the version you wish to flash, then it will be downloaded. | ||
| + | This download needs space and not all receivers have enough space to save the downloads, so in case you have no Hard Disk Drive placed in the box, you'll need to put a USB stick in the box (be sure that it is formatted in Fat32 modus). Free space of 2-4 Gb would be nice, although 1 Gb is sufficient too. | ||
| + | |||
| + | At the beginning of this flash process you will be asked, if you want to restore a backup after the flash, if you want so, a medium (USB stick or Hard Disk Drive) should be accessible for the backup to be saved to (this can be the same one that you use to save the downloads). | ||
| + | |||
| + | First the backup will be done, then the image you have chosen will be downloaded. | ||
| + | If all goes well, then after the flash there will be an automatic restore of picons, settings and plugins, well the ones that are present in the OpenPLi feeds. | ||
| + | |||
| + | <span style="color:red">'''NB''': This option is not available on hardware using NFI images, such as the DM8000 !</span> | ||
| + | |||
| + | <u>Always be careful and first [[Backup | <span style="color:SteelBlue">Backup</span>]] everything.</u> | ||
| + | |||
| + | |||
| + | |||
| + | ===So the FlashImage procedure is as follows:=== | ||
| + | ---- | ||
| + | *Push Menu on your remote and choose setup. | ||
| + | *Choose ‘Flash image’ and wait for further information, when your box has an internet connection a list of the available images for your box will be displayed. | ||
| + | *Now you decide which image you want to flash and whether you would like to make a backup first (this backup will restore everything after the flash). | ||
| + | *Depending on your hardware the box is going to install the image you choose | ||
| − | |||
| − | |||
<br /> | <br /> | ||
[[File:Flash_Procedure-001.gif|Left]] | [[File:Flash_Procedure-001.gif|Left]] | ||
| + | *When the flash is done the backup will will restore all your picons (this can take some time), settings and most plugins (well, the ones that are in the OpenPLi feed). | ||
| − | + | [[File:Flash_Procedure-004.jpg|Left|720px]] | |
==Installation Wizard== | ==Installation Wizard== | ||
| − | After a fresh flash (so no backup used) OpenPLi will start with the installation wizard, which will guide you through the installation and the following steps (''b.t.w. you can always go back a step using the "exit" button on your remote control!''): | + | After a fresh flash (so no backup used) or your first install, OpenPLi will start with the installation wizard, which will guide you through the installation and the following steps (''b.t.w. you can always go back a step using the "exit" button on your remote control!''): |
| − | + | *Select your language (after having chosen the language, OpenPLi (Enigma) restarts) | |
| − | + | Video input selection | |
# Video Mode selection | # Video Mode selection | ||
# Overscan wizard | # Overscan wizard | ||
# Connect your receiver to the internet (when a DHCP server is present this will be easiest) | # Connect your receiver to the internet (when a DHCP server is present this will be easiest) | ||
# Internet Connection will be checked | # Internet Connection will be checked | ||
| − | # Tuners will be setup, so you'll have to know which satellites you can connect to. | + | # Tuners will be setup, so you'll have to know which satellites you can connect to or you can let OpenPLi have to search for them. |
| − | # When you have an Internet connection it will ask if you want to download a channel list. | + | # As of OpenPLi 7.0, when no tuners are present or there is no connection to dish or cable, you can choose "disabled" at "Please setup tuner A" and press "OK" on the remote , then a fallback tuner option is presented to make use of the tuners of another receiver in your network. |
| + | #*When you are in the configure the fallback tuner it is possible to import some settings from the fallback receiver. | ||
| + | #*When you want to use the fallback tuner it is best, to choose here to import the Channels from the remote receiver. | ||
| + | # When tuners have been found and when you have an Internet connection, it will ask if you want to download a channel list. | ||
# Then you will be asked if you want to download any [[Plugin_Wiki | <span style="color:SteelBlue">plugins</span>]] (like a [[Softcam | <span style="color:SteelBlue">Softcam</span>]]). | # Then you will be asked if you want to download any [[Plugin_Wiki | <span style="color:SteelBlue">plugins</span>]] (like a [[Softcam | <span style="color:SteelBlue">Softcam</span>]]). | ||
| + | #As of OpenPLi 7.0 you will be asked to select the [[Tips_and_Tweaks#Access_level_or_User_Mode | <span style="color:SteelBlue">User Mode/Access Level </span>]], where you can choose between 3 different user modes; Normal, Advanced or Expert. Each mode will reveal more options in the Menu to setup. | ||
| + | <br /> | ||
| − | [[File:Installation- | + | [[File:Installation-0014.gif|frameles|Left]] |
Latest revision as of 14:48, 15 July 2021
Contents
Installing OpenPLi (Flashing)
When you want to install OpenPLi on your receiver/box/STB, you can do this by using an USB stick with a image (=installation files), which you download from the download section. This procedure or method is called flashing. The instruction how to flash a certain type of receiver can be found in the Supported Receivers section of the Wiki.
Download section
In the download section you can find the latest firmware images for your receiver. The current development strategy consists of 2 different versions:
- Development. (Nightly Build) Images created from the latest development codebase. These are for developers only, unstable, and may break at any point.
These versions are not released to the public.At current the strategy has changed and develop is released to the public, but remember these are not thoroughly tested and can break down at any moment. Release candidate. These are precursors to a stable release, used for final public testing before creating a stable release. Only use if you want to test and report back issues to the forum.At current (OpenPLi > 8.0) develop/Nightly Build is released for anyone to test and as such there are no more release candidates.- Stable release. This version is deemed suitable for every day use, even if you are a novice or not technically savvy.
Stable releases are supported for endusers, through the support section on our forums website and is the one we recommend you should choose.
Flash from the Menu (FlashImage support)
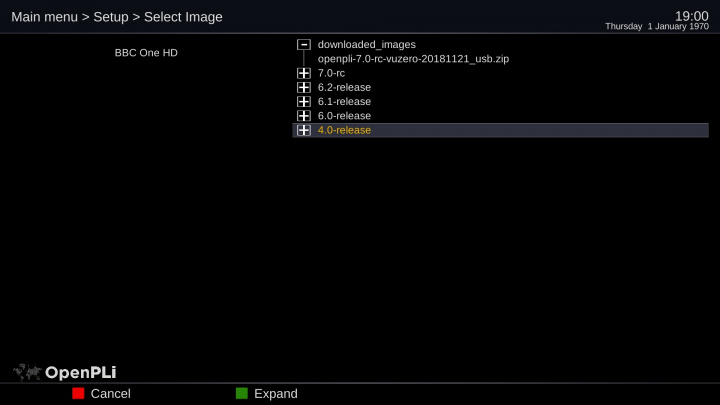
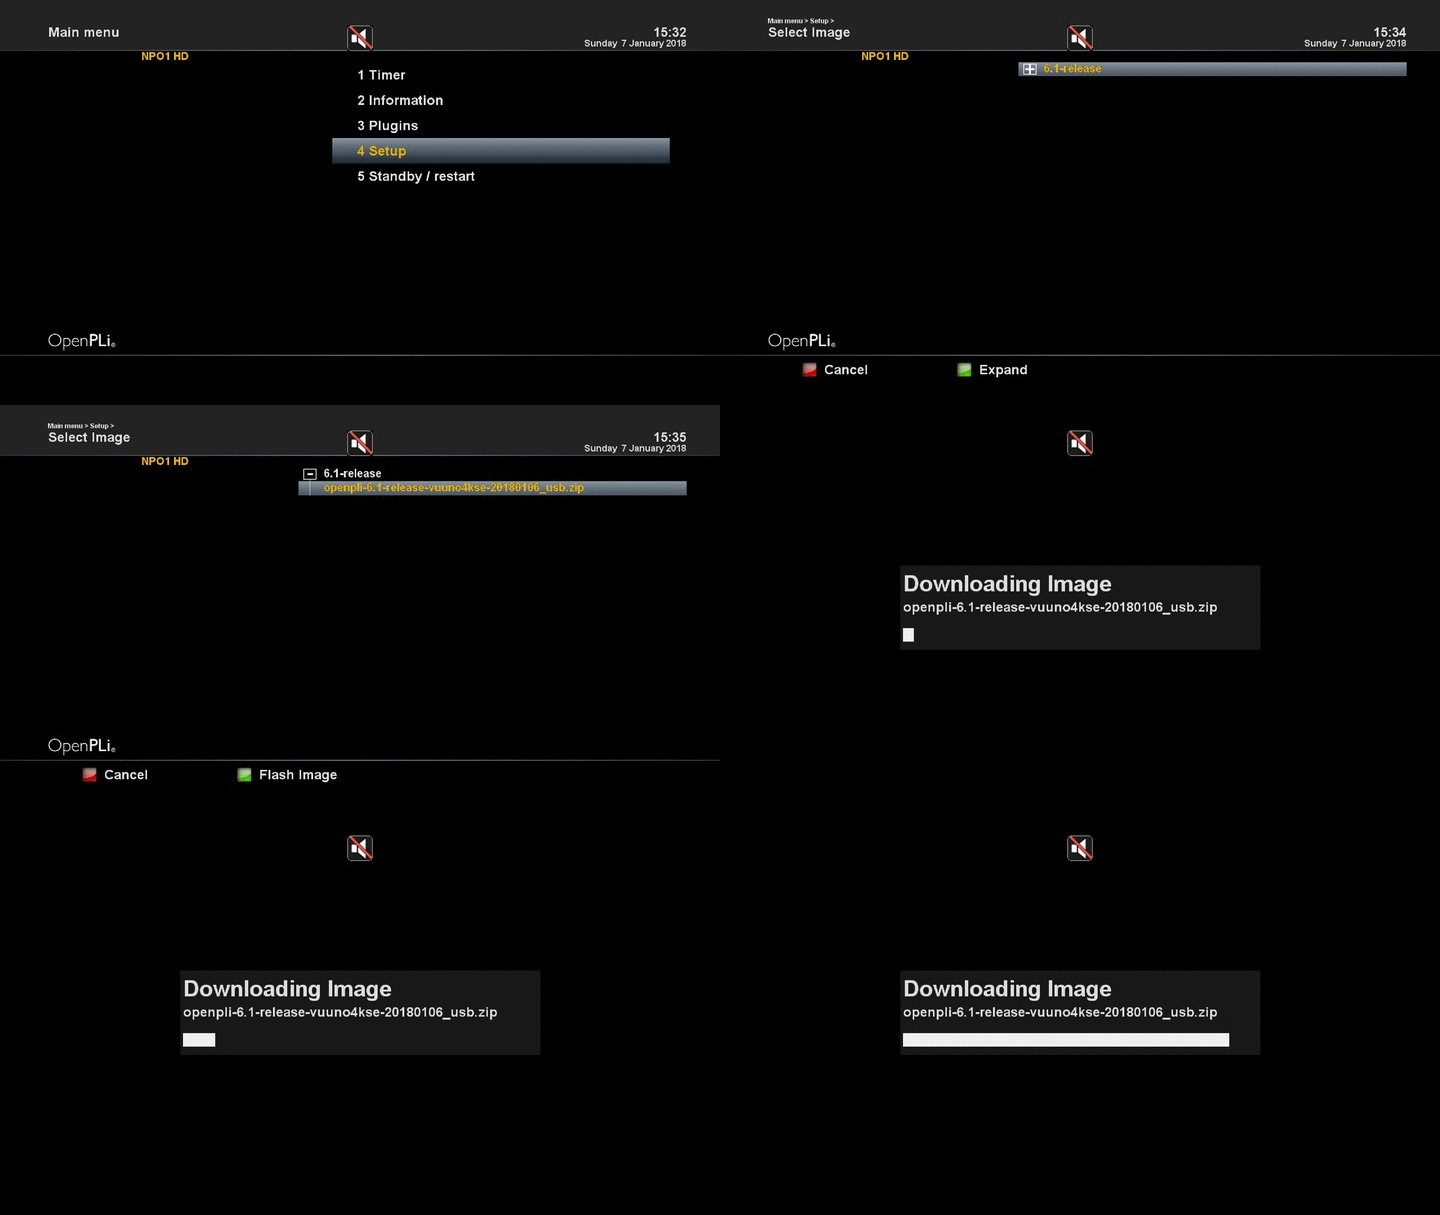
As of OpenPLi 6.1 there is the possibility to flash your receiver from the menu to another version, (see animation below). Remember this is a flash, not an upgrade.
As in the picture above you first choose the version you wish to flash, then it will be downloaded. This download needs space and not all receivers have enough space to save the downloads, so in case you have no Hard Disk Drive placed in the box, you'll need to put a USB stick in the box (be sure that it is formatted in Fat32 modus). Free space of 2-4 Gb would be nice, although 1 Gb is sufficient too.
At the beginning of this flash process you will be asked, if you want to restore a backup after the flash, if you want so, a medium (USB stick or Hard Disk Drive) should be accessible for the backup to be saved to (this can be the same one that you use to save the downloads).
First the backup will be done, then the image you have chosen will be downloaded. If all goes well, then after the flash there will be an automatic restore of picons, settings and plugins, well the ones that are present in the OpenPLi feeds.
NB: This option is not available on hardware using NFI images, such as the DM8000 !
Always be careful and first Backup everything.
So the FlashImage procedure is as follows:
- Push Menu on your remote and choose setup.
- Choose ‘Flash image’ and wait for further information, when your box has an internet connection a list of the available images for your box will be displayed.
- Now you decide which image you want to flash and whether you would like to make a backup first (this backup will restore everything after the flash).
- Depending on your hardware the box is going to install the image you choose
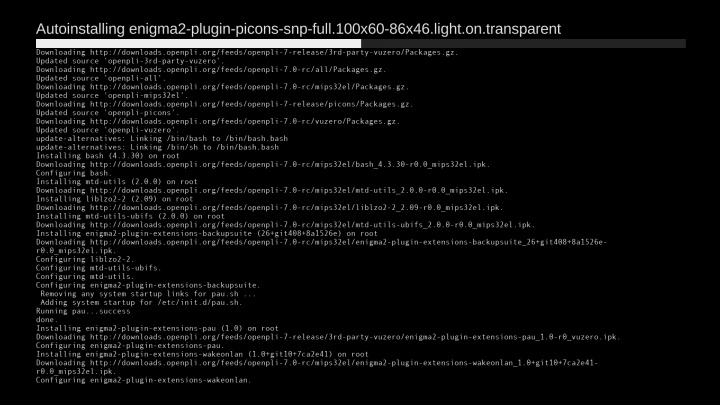
- When the flash is done the backup will will restore all your picons (this can take some time), settings and most plugins (well, the ones that are in the OpenPLi feed).
Installation Wizard
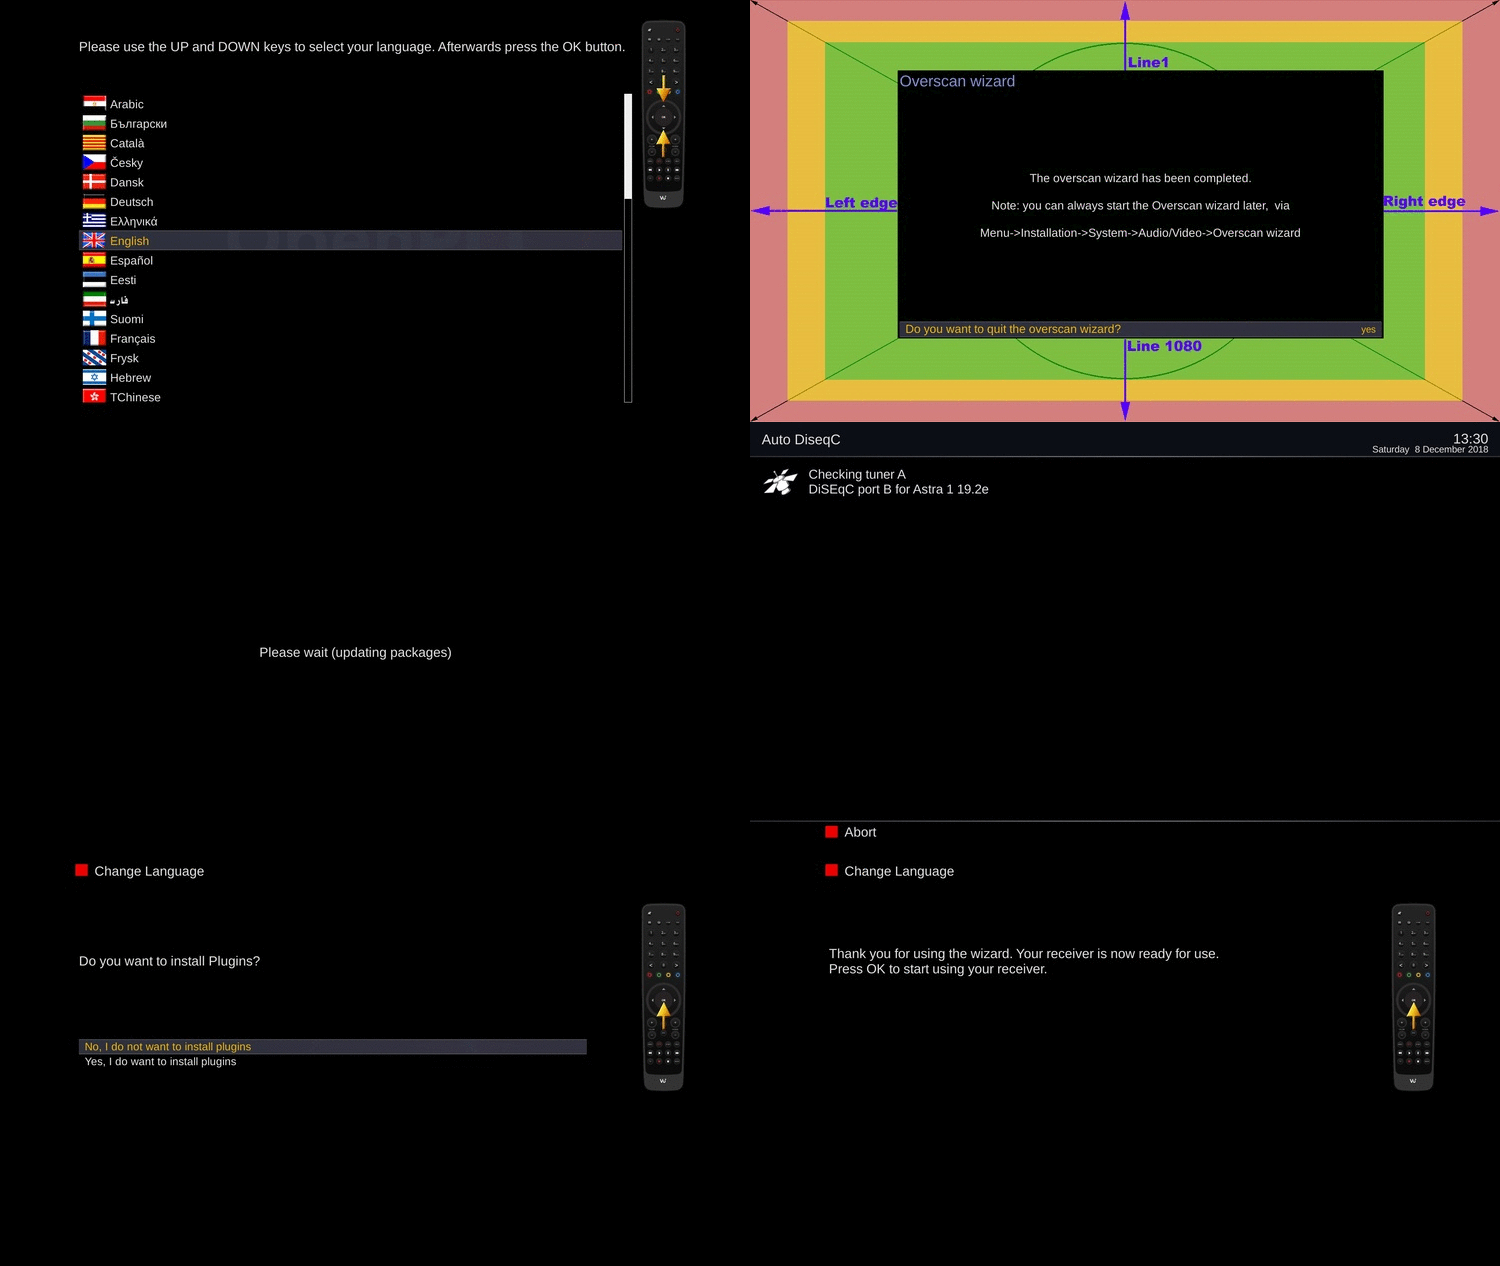
After a fresh flash (so no backup used) or your first install, OpenPLi will start with the installation wizard, which will guide you through the installation and the following steps (b.t.w. you can always go back a step using the "exit" button on your remote control!):
- Select your language (after having chosen the language, OpenPLi (Enigma) restarts)
Video input selection
- Video Mode selection
- Overscan wizard
- Connect your receiver to the internet (when a DHCP server is present this will be easiest)
- Internet Connection will be checked
- Tuners will be setup, so you'll have to know which satellites you can connect to or you can let OpenPLi have to search for them.
- As of OpenPLi 7.0, when no tuners are present or there is no connection to dish or cable, you can choose "disabled" at "Please setup tuner A" and press "OK" on the remote , then a fallback tuner option is presented to make use of the tuners of another receiver in your network.
- When you are in the configure the fallback tuner it is possible to import some settings from the fallback receiver.
- When you want to use the fallback tuner it is best, to choose here to import the Channels from the remote receiver.
- When tuners have been found and when you have an Internet connection, it will ask if you want to download a channel list.
- Then you will be asked if you want to download any plugins (like a Softcam).
- As of OpenPLi 7.0 you will be asked to select the User Mode/Access Level , where you can choose between 3 different user modes; Normal, Advanced or Expert. Each mode will reveal more options in the Menu to setup.
Remember that if no Softcam is installed your card will not work and that if no channel list is installed, you will have to do a scan or download one from the settings section in the Plugin browser. Ofcourse you can change all the above settings afterwards, if you want.
Notice to HDMI-CEC users: By default the HDMI-CEC option is turned off. If you want to use the HDMI-CEC function...
- Go to Menu->Setup->System->Customize
- Put the Setup mode to Advanced and press green (OK)
- Select Audio / Video->HDMI-CEC setup and Enable the function.
AutoBackup
When you have made a backup with the plugin AutoBackup and this backup is on a media that is accessible from the startup of your receiver, than during the installation, OpenPLi will restore all your settings, picons and some plugins. Well, the ones that are in the OpenPLi feed. Depending on your internet speed and the amount of data that has to be restored, this can take a few minutes.


