Difference between revisions of "Backup/AutoBackup"
| Line 29: | Line 29: | ||
When you want to flash your receiver with OpenPLi, take the following steps: | When you want to flash your receiver with OpenPLi, take the following steps: | ||
*Remove all the USB devices from you receiver | *Remove all the USB devices from you receiver | ||
| − | * | + | *Follow the instruction how to flash a certain type of receiver [[Supported Receivers | <span style="color:SteelBlue">Supported Receivers</span>]] |
| + | |||
*Flash your receiver with the image | *Flash your receiver with the image | ||
*After flashing remove the USB stick with the image | *After flashing remove the USB stick with the image | ||
Revision as of 15:24, 27 November 2018
When you quickly want to flash your receiver and keep all your settings, the AutoBackup plugin is a very handy tool that will help you restore almost everything after a flash procedure. Being restored are:
- All your satellite and bouquet settings
- CCcam/Oscam settings
- Network settings
- Timer settings
- Some plugins, well the ones that are present in the OpenPli feeds.
- Etc.
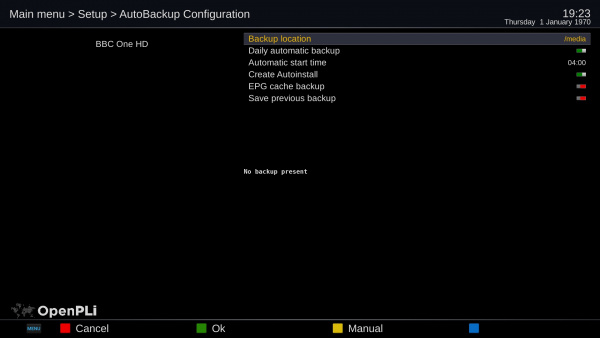
How to create an AutoBackup
As of OpenPLi 7 AutoBackup has moved from the plugin browser to Main menu > Setup > AutoBackup, until OpenPLi 6.2 it was present in the plugin browser Menu > Plugins
- Select a Backup location, preferable a USB device
- Daily automate backup: Enable
- Select a time: e.g. 04:00
- Create Autoinstall: on
- EPG cache backup: off
To test, select the yellow button.
If everything is ok, you see the Last Backup date with a recent timestamp.
How to use AutoBackup
When you want to flash your receiver with OpenPLi, take the following steps:
- Remove all the USB devices from you receiver
- Follow the instruction how to flash a certain type of receiver Supported Receivers
- Flash your receiver with the image
- After flashing remove the USB stick with the image
- Insert the USB stick that holds the AutoBackup files
- Reboot
- You will be asked if you want to restore the AutoBackup
Depending the receiver the box will start immediately after flashing. During the first installation when a backup file is found on the USB stick a question is asked whether you wish to restore the previous backup. The default choice is 'yes'. Now the installation process will restore the receiver with the settings that are known before you flashed your receiver. In case you chose 'no' the box is flashed without restoring a previous backup, so you have to setup the box by yourself. In some cases it is better to perform a clean flash to avoid that previous experienced issues are restored.
(*1) Remark.. You can also put the image on the existing USB disk, but you will need to remove the image file after your flash procedure. If you don't do this, your receiver will be re-flashed if you update your receiver through the software-update option.
