Difference between revisions of "Multiboot"
(→AutoBackup) |
(→Adding other OpenPLi versions) |
||
| (20 intermediate revisions by the same user not shown) | |||
| Line 1: | Line 1: | ||
==Intro== | ==Intro== | ||
| − | Many Vendors offer | + | Many Vendors offer multiboot, this receiver specific feature, when available makes it possible to install multiple images on a receiver. So like 3 or more versions of PLi, how much images you can install when it is supported depends on the slots, let's say the partitions that are present.<br> |
| − | When this feature is supported by your receiver then basically OpenPLi offers 2 images in the [http://openpli.org/download <span style="color:SteelBlue">download section</span>] | + | When this feature is supported by your receiver then basically OpenPLi offers 2 images in the [http://openpli.org/download <span style="color:SteelBlue">download section</span>] The "recovery image" which will give you a multiboot system, not only between E2 and Android, but also between different E2 images, which you can flash either from the boot menu, or from the image. When you flash the "emmc" image, you don't have multiboot, but only a single image, like with other boxes. |
| + | |||
| + | ==Adding other OpenPLi versions== | ||
| + | When you have multiboot you can install an image in every free slot (= partitions where you can install an image). How many free slots you will have, depends on your hardware, meaning which vendor receiver you have. In each slot you can install an OpenPLi version and there is the option between with or without a backup. Easiest way to install another image is to [https://wiki.openpli.org/Installation#Flash_from_the_Menu_.28FlashImage_support.29 <span style="color:SteelBlue"> flash from the menu</span>] | ||
==AutoBackup== | ==AutoBackup== | ||
When you flash a multi boot version from the menu a backup is created and restored by default. When this flash process starts there is a time window to cancel it, so by default a backup is created from the current image and will be restored right after the flash on the newly installed image. In most cases and certainly when there is no HDD present, a USB stick with enough space, has to be plugged into the receiver so create the backup. These backup files are relatively small. In many cases it is best to use a USB stick of about 1 Gb, albeit to store the downloaded image. | When you flash a multi boot version from the menu a backup is created and restored by default. When this flash process starts there is a time window to cancel it, so by default a backup is created from the current image and will be restored right after the flash on the newly installed image. In most cases and certainly when there is no HDD present, a USB stick with enough space, has to be plugged into the receiver so create the backup. These backup files are relatively small. In many cases it is best to use a USB stick of about 1 Gb, albeit to store the downloaded image. | ||
| − | ==How to select an installed | + | ==How to select an installed multiboot image== |
| − | There are 2 ways to select the image to boot from. Using the remote control simply press Menu and go into Standby/Restart menu. Press long on the power control button using your remote control a menu appears and as you can see in the picture below there is the "Multiboot image selector" option, once pressed it offers the images you have installed. | + | There are 2 ways to select the image to boot from. Using the remote control you simply press Menu and go into Standby/Restart menu. Press long on the power control button using your remote control a menu appears and as you can see in the picture below there is the "Multiboot image selector" option, once pressed it offers the images you have installed. |
[[File:Multiboot-003.jpg|centre|750px]]<br> | [[File:Multiboot-003.jpg|centre|750px]]<br> | ||
| Line 21: | Line 24: | ||
Once you remove an image, the <span style="color:gold;font-size: 100%"> '''yellow button'''<span style="color:black;font-size: 100%"> changes to restore deleted images, in case you made a mistake. Even when you reboot you can restore deleted images, once you install a new one it the "old slot" it will be gone! | Once you remove an image, the <span style="color:gold;font-size: 100%"> '''yellow button'''<span style="color:black;font-size: 100%"> changes to restore deleted images, in case you made a mistake. Even when you reboot you can restore deleted images, once you install a new one it the "old slot" it will be gone! | ||
| + | |||
| + | |||
| + | =='''Adding other images than OpenPLi'''== | ||
| + | If you want to add any other images, well other than OpenPLi, for example OpenATV, you download there zip file for your receiver from the internet (in the example below it is for the Ustym 4K Pro), <u>do not unpack this zip file</u>, so keep it intact and copy it to the root | ||
| + | USB Drive(d):/openatv-6.4-ustym4kpro-20210117_mmc.zip | ||
| + | of an USB stick. Insert this USB stick with the zip file on it into the usb port of your receiver. Then use the flash from the [[Installation#Flash_from_the_Menu_.28FlashImage_support.29 | <span style="color:SteelBlue"> menu</span>]] procedure. When you go to Main menu -> Setup -> Flash image open the "Downloaded Images" here you will find the zip file you copied to the usb stick, see below. | ||
| + | |||
| + | [[File:Multiboot-006.jpg|centre|750px]]<br> | ||
==Recover/boot Menu== | ==Recover/boot Menu== | ||
| − | As you can see in the picture above there is an option (last one) to boot to a ''"Recovery Menu"'' this is a vendor specific option, meaning it has nothing to do with OpenPLi | + | As you can see in the picture above there is an option (last one) to boot to a ''"Recovery Menu"'' this is a vendor specific option, meaning it has nothing to do with OpenPLi. You can compare it with the bios on a mother board of a PC. Most vendors use a specific combination of pressing button's on the remote control or on the receiver to access this menu and for this you will need to look at the vendor's website or manual. OpenPLi offers it from the menu. |
Latest revision as of 17:23, 8 December 2021
Contents
Intro
Many Vendors offer multiboot, this receiver specific feature, when available makes it possible to install multiple images on a receiver. So like 3 or more versions of PLi, how much images you can install when it is supported depends on the slots, let's say the partitions that are present.
When this feature is supported by your receiver then basically OpenPLi offers 2 images in the download section The "recovery image" which will give you a multiboot system, not only between E2 and Android, but also between different E2 images, which you can flash either from the boot menu, or from the image. When you flash the "emmc" image, you don't have multiboot, but only a single image, like with other boxes.
Adding other OpenPLi versions
When you have multiboot you can install an image in every free slot (= partitions where you can install an image). How many free slots you will have, depends on your hardware, meaning which vendor receiver you have. In each slot you can install an OpenPLi version and there is the option between with or without a backup. Easiest way to install another image is to flash from the menu
AutoBackup
When you flash a multi boot version from the menu a backup is created and restored by default. When this flash process starts there is a time window to cancel it, so by default a backup is created from the current image and will be restored right after the flash on the newly installed image. In most cases and certainly when there is no HDD present, a USB stick with enough space, has to be plugged into the receiver so create the backup. These backup files are relatively small. In many cases it is best to use a USB stick of about 1 Gb, albeit to store the downloaded image.
How to select an installed multiboot image
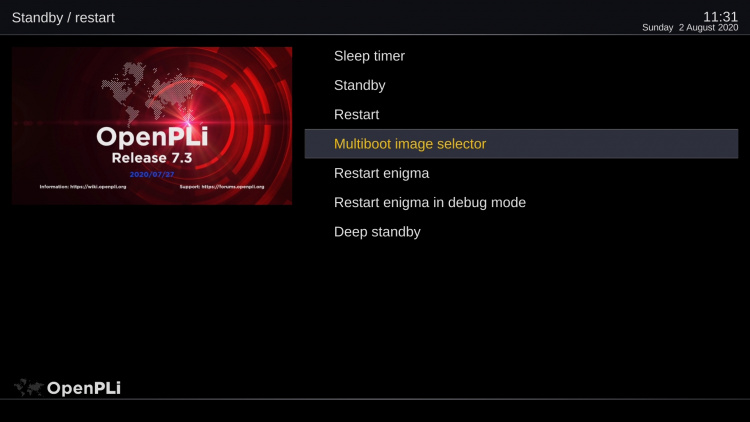
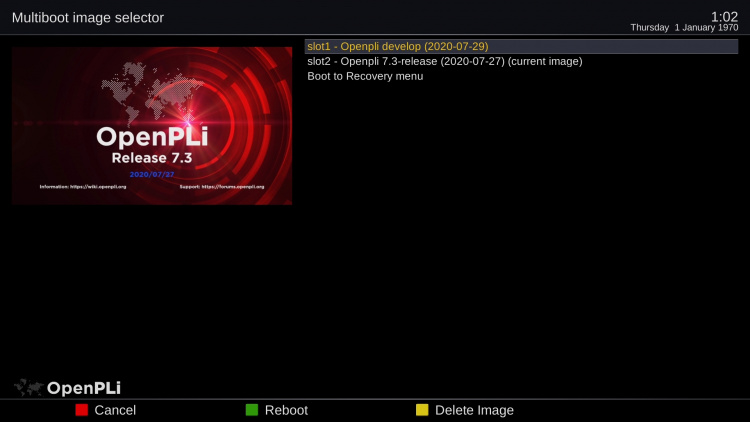
There are 2 ways to select the image to boot from. Using the remote control you simply press Menu and go into Standby/Restart menu. Press long on the power control button using your remote control a menu appears and as you can see in the picture below there is the "Multiboot image selector" option, once pressed it offers the images you have installed.
Now you can pick one and OpenPLi will boot into it.
There is also the possibility by pressing yellow button to remove an image.
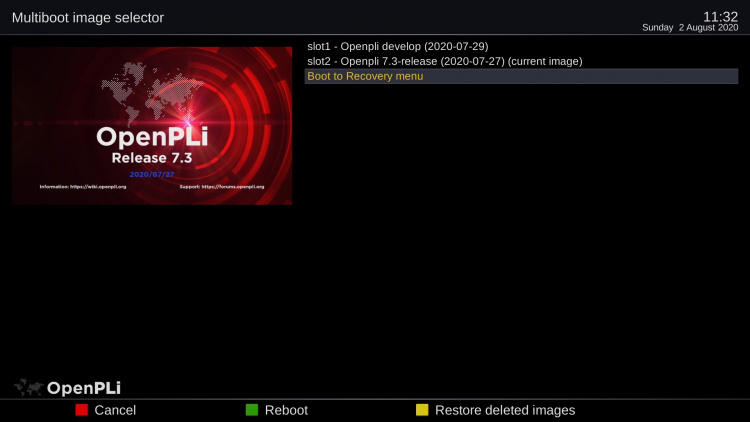
Once you remove an image, the yellow button changes to restore deleted images, in case you made a mistake. Even when you reboot you can restore deleted images, once you install a new one it the "old slot" it will be gone!
Adding other images than OpenPLi
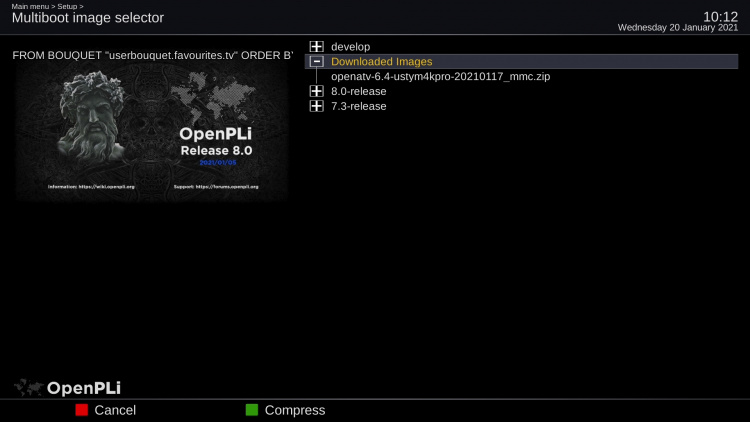
If you want to add any other images, well other than OpenPLi, for example OpenATV, you download there zip file for your receiver from the internet (in the example below it is for the Ustym 4K Pro), do not unpack this zip file, so keep it intact and copy it to the root
USB Drive(d):/openatv-6.4-ustym4kpro-20210117_mmc.zip
of an USB stick. Insert this USB stick with the zip file on it into the usb port of your receiver. Then use the flash from the menu procedure. When you go to Main menu -> Setup -> Flash image open the "Downloaded Images" here you will find the zip file you copied to the usb stick, see below.
Recover/boot Menu
As you can see in the picture above there is an option (last one) to boot to a "Recovery Menu" this is a vendor specific option, meaning it has nothing to do with OpenPLi. You can compare it with the bios on a mother board of a PC. Most vendors use a specific combination of pressing button's on the remote control or on the receiver to access this menu and for this you will need to look at the vendor's website or manual. OpenPLi offers it from the menu.


