Tips and Tweaks
Contents
- 1 Accessing your receiver and editing files
- 2 Adding IP Camera's to your channellist
- 3 Bootlogo location
- 4 Crash logs
- 5 Do or don't - placing a Solid Sate Disk SSD in your satellite receiver
- 6 ECM info
- 7 Edit files on a Linux system
- 8 Having your receiver always using the correct time
- 9 HDD and temperature
- 10 Mediaplayer (gstreamer) and subtitles
- 11 Menu Levels
- 12 Recording with a Zapper (eg. Vu Zero / Vu Solo Se)
- 13 Samba in OpenPLi
- 14 Screenshot
- 15 Searching the forum is not perfect
- 16 Accessing the receiver using a (internet)browser
- 17 Settings file in OpenPLi
- 18 Shell
- 19 Skip time
- 20 Wireless Bridge
- 21 Connect DVD player to USB port on Vu boxes
Accessing your receiver and editing files
You can change many settings using the Graphical User Interface (GUI), but in some cases it can be necessary to access the files manually. You can do this by downloading and using Putty. By default you can login with telnet, so if you use puttytel.exe (a Telnet-only client) and login your box. By default there is no password for the root, so login with "root" and so you should not have to enter a password.
Telnet usage
By default the enigma receiver does not have a password. To access the receiver via de command line, use a program like Putty, or use the command 'Telnet' from the commandline.
telnet <ip address receiver>

telnet 192.168.65.247
Trying 192.168.65.247...
Connected to 192.168.65.247.
Escape character is '^]]'.
Username: root
Password: no password, leave blank
Telnet with Mac OS High Sierra
With the arrival of Mac OS High Sierra, the Telnet command has been removed. You need to use network connect (nc) instead of telnet the syntax to use is:
nc ip_of_box 23
(where 23 is the port used for the telnet service).
Anyway if you want to restore the telnet command, see this post on StackOverflow.
Note that you only need to install telnet, not the other tools mentioned in the post!
How to use SSH instead of Telnet
SSH runs on OpenPLI by default.... But, to use SSH you need to set a password first.
First Login with telnet. (See above)
Then change the password with the command 'passwd'.
root@et7x00:~# passwd
Changing password for root
Enter the new password (minimum of 5 characters)
Please use a combination of upper and lower case letters and numbers.
New password:
Re-enter new password:
passwd: password changed.
Then close the telnet session
root@et7x00:~# exit
Connection closed by foreign host.
Ok, now the box is ready to be accessed by ssh:
ssh root@192.168.65.247
Warning: Permanently added 'p247,192.168.65.247' (RSA) to the list of known hosts.
root@p247's password:
root@et7x00:~#
Remark: When you connect for the first time with ssh, you'll get a fingerprint notification. You can accept this by typing 'yes'
RSA key fingerprint is SHA256:x2iV/az3N6IVgWYEpAw4mDE5ahaRX2hEDb7xxEgaVO9.
Are you sure you want to continue connecting (yes/no)? yes
I forgot my password
If you forgot your password or used an extension for changing it with OpenPLi you can clear the password by editing the first line in /etc/shadow which contains the hash of your password.
Just delete the second parameter.
example:
root:.3nwZcSK66fbg:15617:0:99999:7::: \\with password:

root::15617:0:99999:7::: \\without password:
How to create a log file of your Putty session
If you want to record what is happening during your Putty session here is how you can let Putty Record it.
Install an IPK file
When you come across a plugin that you want to install in OpenPLi, you can do this with one of the following 2 methods:
Using the graphical user interface
- Copy your IPK file to a removable medium like an USB stick.
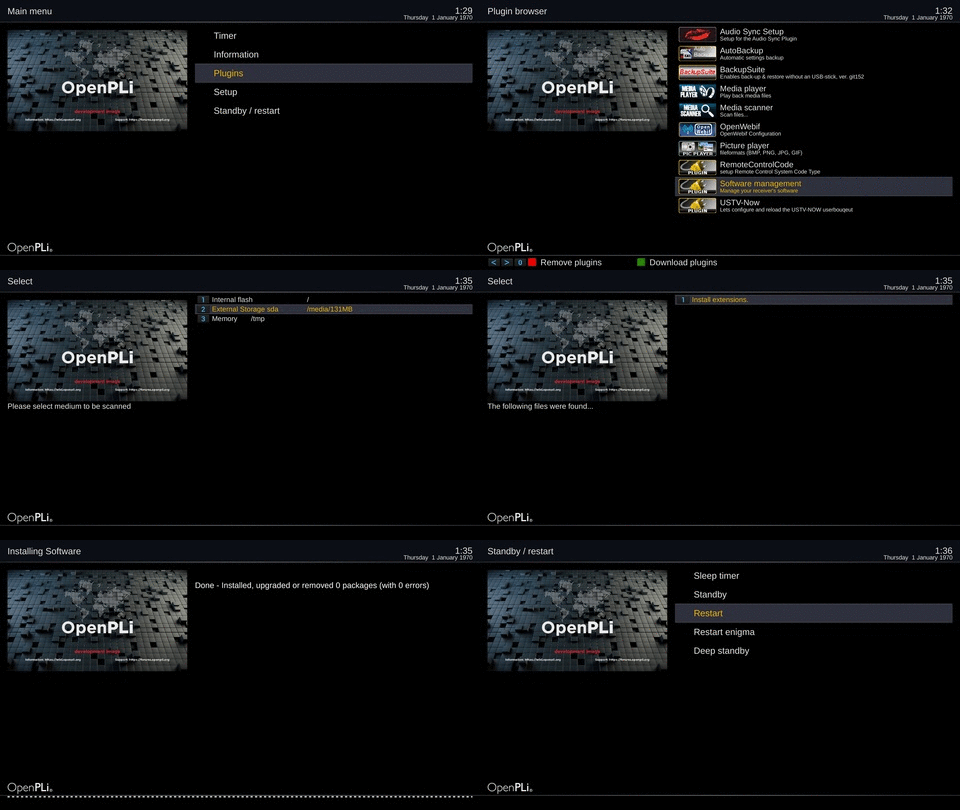
- Then in OpenPLi goto the Main Menu -> Plugins -> Software management -> Install local extension
- Then select your media
- Select 1 Install extensions, select the IPK file and press the green button
- Now your IPK will be installed and if everything is nicely coded there should be no error messages
- Reboot your box and if all is well then under Plugins your program should be there.
Using the command line interface
copy your IPK file onto your box to the folder /tmp
- login your box with Telnet (Putty) and enter the following commands at the command line:
cd /tmp
opkg install pluginname.ipk
Note: if you'll reboot the IPK will be removed from the /tmp folder as it is a temporary folder!!
Adding IP Camera's to your channellist
It is possible to watch your IP Camera on TV. Here you can find the necessary information.
Bootlogo location
When you want to change the bootlogo for some reason. You can find it in the location
/usr/share
the file your are looking for is
bootlogo.mvi
Crash logs
Crash logs are generated during a system crash, also known as a GSOD (green screen of death). The log can give insight to the probable cause of the crash. If you want help with the content of the file, you can post it on our forum. The crash log file is named like in the example below:
enigma2_crash_3891289128.log
The location of the crash log file when there is a HDD (Harddisk) present
Normally the crash.log file is stored in the root of the HDD so in
/media/hdd
The location of the crash.log file without any HDD (Harddisk) present
Normally the crash log file is stored in the
/home/root
Do or don't - placing a Solid Sate Disk SSD in your satellite receiver
Placing a Solid State Drive (SSD) in a (satellite) receiver is a topic that is regularly discussed on this forum. SSD’s make (desktop and labtop) computers spectacularly faster, so it is not surprising anyone wanting to replace a Hard Disk drive (HDD) or install an SSD in a receiver. However, it is a bad idea, because there are no advantages of an SSD in a receiver.
On a desktop computer, especially when starting up the device, many small files are read. A reading pattern is created in which data from random locations on the disk can be read. A 7200 rpm drive (HDD) can change location approximately 83 times per second, this has to do with the (reading) head's travel time and the time waiting as it circulates for all the data to pass the head.
An SSD can change places tens of thousands of times per second and this is where the spectacular speed difference compared to a HDD comes from. Although a HDD performs much better when it reads large files (the data is then contiguous and the HDD can then reach speeds above 200MB/s), an SSD is still faster as it achieves speeds up and over 500MB/s.
Recordings of television broadcasts are large, contiguous files. The bitrates for broadcasts are roughly between 1.5 and 25 Mb/s, which translates into speeds of about 175KB/s to 3125KB/s. The read/write pattern therefore corresponds well to what hard drives are good at and the speeds that are needed are far below what a hard drive can deliver. So even when you do a lot of recordings at the same time, you will not quickly reach the limit of the hard drive. That is why the difference in speed that you experience when you use an SSD is practically zero. Some users note, that if they copy files over the network, the speeds are lower than expected (for example 70MB/s) and they think that the hard disk is the cause. This is unjustified, the hard drive is not the bottle neck. The bottle neck is located elsewhere in the receiver. The cause are the network controller and the disk controller, which are not as powerful as the equivalents in desktop and labtop computers. This has to do with the relatively low speeds that are required, because there is no added value for the manufacturers of the relevant chips to build fastest controllers. Energy consumption and price of the chip are factors that play an important role here.
The energy consumption of an SSD is lower than that of a HDD. So energy consumption and the associated heat production is, of course, an argument. However, a HDD in an OpenPLi supported receiver doesn’t run continuously, but is only activated when necessary, so the energy consumption is already very low, especially HDD’s intended for laptops often consume scarcely more than an SSD. So this benefit can also be questioned.
So we can conclude that an SSD is not ideal, but what do you have to put in your receiver? The best choice is a traditional HDD with a speed of 5400 rpm. This gives you a lot of capacity/euro and is a lot faster than necessary. The use of 5400 rpm ensures low energy consumption and these discs are generally completely inaudible due to the low speeds. A 3.5-inch copy is usually fine, 2.5-inch for laptops are even more economical, but offer less capacity. If energy use or heat is really very critical, take a 2.5-inch and some receivers only have space for 2.5 inches.
ECM info
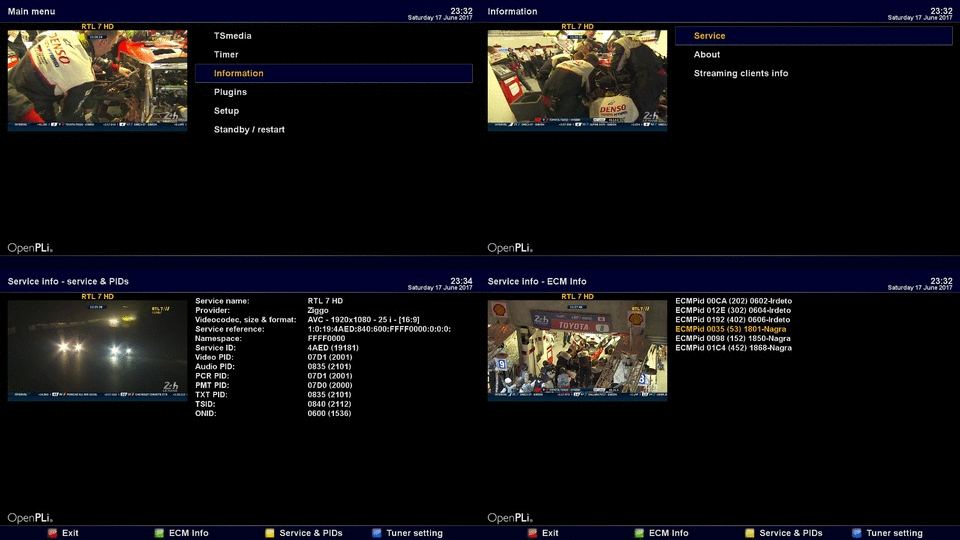
If you want to see how the current channel is encrypted, you can look this up with ECM Info. The white lines tels you what kind of encryptions are being used and the yellow line tells you with type of encryption is used to decrypt the channel. lems with the stability of your WiFi connection) to make use of a wireless bridge.
Edit files on a Linux system
When you want to edit files on a Linux distro (distribution) like Enigma2 (OpenPLi) it's best to use the native editors like Vi, VIM or Nano. For Windows users that don't want to use telnet, but want to edit files it is not advisable to use the default Windows editors, like WordPad or NotePad. What you can you use instead is Notepad++ , it's a free source editor and you can download it at Notepad++
If you want to use Nano at your receiver you can install nano with the command:
opkg update && opkg install nano
Having your receiver always using the correct time
Having the correct time is essential for many processes in your receiver, albeit only for your time scheduled recordings. There are 2 ways to ensure that the box has the correct time right at start-up:
- Setting up a startup transmitter on a transponder with the right time, any Astra transponder will do, so like BBC1 HD or NPO1 HD. Take a look at Startup service for the details and how to set it up.
- Install the system-time plugin and setting it to retrieve the time from on-line (Internet) service, during booting (startup) of your box. Check out the Plugin section of the Wiki, to download it on your box, goto Systemplugins.
Note: If your box has an Internet connection, option 2 is the most stable one.
HDD and temperature
If for some reason you are interested in the temperature of your harddisk, then you can install a plugin using telnet, it must be done manually.
opkg install hddtemp
and then use:
hddtemp /dev/sdX ... X is a, b, c ...
Mediaplayer (gstreamer) and subtitles
OpenPLi's media player gstreamer can play many external content, like MKV, MP4, etc. If you want to add a subtitle to these containers (MKV, MP4, etc) it is best to mux them. Muxing is the process of combining these video, audio and subtitle components into the container file, so that it can be read/played back. Take a look at GStreamer
Menu Levels
The enigma receiver has a lot of options in the menu. Some are easy to understand, and some are not so common used. So we reworked the menu's Setup\System section.
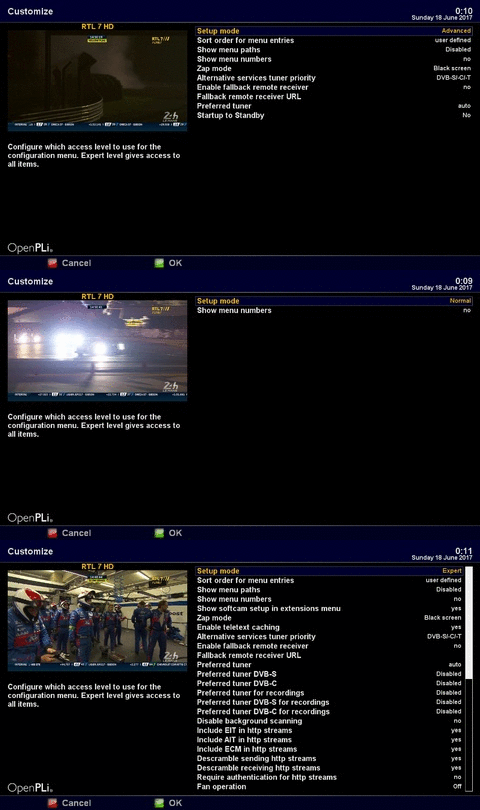
The main goal is that simple, advanced and expert settings are properly separated. At the Customize option you can enter Normal, Advanced or Expert. This will result in less or more options in the Customize option and also on the User interface, Audio / Video and Expert settings menu's.
Recording with a Zapper (eg. Vu Zero / Vu Solo Se)
By default some Vu+ boxes are a zapper, meaning you can not record with it. If you want to record with it, you can install the "pau" plugin/extension. It is located in the extensions section of the plugin browser.
Samba in OpenPLi
By default Samba is working, meaning the daemon/service is run at startup and should make all media accessible from any external device. There are no passwords or login required, guest access is on. As the Samba package is kept small there is no easy way to create passwords for users.
When you want to access you box media (HDD, Root or external media) there are a few ways to do it:
Screenshot
If you want to take a screenshot, let's say to show a certain result to someone, you can make a screenshot of the current state of the screen on your TV using Webif. When in Webif on the left of the screen you open remote control and click on Make screenshot.
You can also generate a screenshot from command line, connect in telnet and type:
this example will generate: screenshot.bmp
cd /tmp
grab
or this example will generate: screenshot.jpg
cd /tmp
grab -j
Then use your favorite ftp client to retrieve the generated screenshot file.
Another option is possible -p to generate a .png file. Yo get all possible options use:
grab -h
Searching the forum is not perfect
The search function on the OpenPLi forum is not perfect. In stead you could use Google and use the following:
here you type the keywords what you are looking for site:openpli.org
Using the above on Google and you search the OpenPLi site for the keywords you have entered, so good luck!
Accessing the receiver using a (internet)browser
When you want to access your receiver using your favorite Internet browser, Firefox, Chrome, Microsoft Edge, Opera or whatever:
Windows
- Click Start button - Click Run and enter:
\\ipaddress-of-your-box\
- Open your browser (FF, IE or ME) and enter the following:
file://///ipaddress-of-your-box/root
file://///ipaddress-of-your-box/Harddisk
file://///ipaddress-of-your-box/Media
Linux
- In your browser (FF, Iceweasel) enter the following:
smb://ipaddress-of-your-box
Mac
- In Finder, select your receiver name at the left side. The common name is your receiver type, like et1000, HD2400
If you want to edit the samba config file at your receiver it is located at:
/etc/samba/smb.conf
Note: OpenPLi 6.x uses Samba version 4 and the syntax is very different from the version used in OpenPLi 4
Settings file in OpenPLi
Many things that you change from the default settings in OpenPLi are stored in the file /etc/enigma2/settings, Bouquets files for radio and TV and enigma settings can be found at this location. If you want to edit/copy/backup this file, it is best to stop source and destination, by doing the following:
root@<receiver>: init 4
This stops Enigma2 (operating system) gracefully, waiting for all it's components to stop and places Enigma2 into a "sleep" mode allowing you to edit or modify files that otherwise would corrupt or become damaged, if edited while running.
now go to /etc/enigma2 and edit/copy/backup the file named settings, when done do:
root@<receiver>: init 3
This wakes enigma from the "sleeping" state and restarts the GUI (Graphical User Interface).
BTW 1 if you want to edit this file and not use Vi (native editor of Unix/Linux) but use a Windows editor, we can advise Notepad++
BTW 2 if you need to edit file in telnet but don't know very well vi you can install nano (opkg update && opkg install nano) this is a more user friendly editor. Simply type: nano filename
BTW 3 Don't use "killall 9 enigma2" this will cause a sudden stop all enigma2 services without waiting to close anything and leave all opened files in an uncertain state!
Shell
By default OpenPLi has a stripped-down version of busybox. If you want more, you could install the "Bash" shell by entering:
opkg update && opkg install bash
Skip time
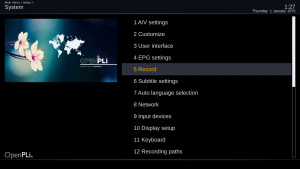
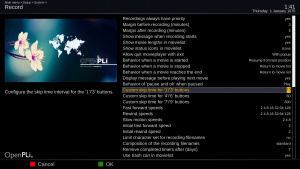
Skip time in a recording works much faster than using the forward or rewind keys on your remote. You can customize the Skip time keys on your remote in Menu > Setup > System > Expert Settings> Record and adjust the settings for '1'/'3' - '4'/'6' -'7'/'9' buttons.
Default:
- 1 = -15 seconds back in the recording
- 3 = +15 seconds forward in the recording
- 4 = -1 minute
- 6 = +1 minute
- 7 = - 5 minutes
- 9 = + 5 minutes
Wireless Bridge
If you want to use WiFi with your box, there are many solutions, like dongles, WiFi USB adapter, powerline adapters, etc. In general we recommend (but certainly if you have problems with the stability of your WiFi connection) to make use of a wireless bridge.
Connect DVD player to USB port on Vu boxes
You can try the following, but you'll need to use the commandline
Install the following:
opkg install kernel module-udf
opkg install kernel module cdrom
opkg install kernel module-sr-mod
opkg install cdtextinfo
opkg install enigma2 plugin-extensions-cdinfo
restart the box and not enigma2!
Then you can connect an external usb CD-DVD player and use it with VU boxes.
